Mutfak Dolapları İçin Kesim Listesi Nasıl Oluşturulur
A kitchen cabinet cut list is a complete inventory of every panel you need to cut for your cabinet project — sides, tops, bottoms, shelves, backs, and drawer components. Creating an accurate cut list before you start cutting can save 15–25% on materials and eliminate costly mistakes from mismeasured or forgotten parts. Whether you're building a single base unit or a full kitchen of 20+ cabinets, the process is the same: measure, plan, list every part, optimize the layout, and export to the workshop.
Anatomy of a Kitchen Cabinet
Before you can create a cut list, you need to understand what goes into a standard kitchen cabinet. Every cabinet — base, wall, or tall — shares the same fundamental structure, even though dimensions vary.
A base cabinet carcass consists of:
- Two side panels — the vertical walls of the box
- Top panel (stretcher rail or full top) — connects the sides at the top
- Bottom panel — the floor of the cabinet
- Back panel — typically thinner material, set into a rebate or nailed to the back
- Shelves — adjustable or fixed, depending on the cabinet's purpose
- Face frame (optional) — solid wood frame on the front, common in American-style kitchens
Drawer cabinets add four components per drawer: two sides, a front, a back, and a bottom panel. A three-drawer base unit therefore adds 15 parts to your cut list on top of the carcass itself.
Door panels are cut separately — either from the same sheet material or from MDF if you plan to paint them.
For materials, the industry standard is 18mm plywood or melamine for carcass components (sides, top, bottom, shelves), 12mm or 6mm plywood/hardboard for back panels, and MDF for painted door fronts. Each material thickness should be treated as a separate group in your cut list because they come from different stock sheets. Understanding standard sheet sizes for your region is essential before you begin.
Step 1 — Measure Your Kitchen
Accurate measurements are the foundation of every kitchen cut list. Measure the following:
- Wall lengths — measure at three heights (floor, mid-wall, ceiling) and use the shortest measurement. Walls are rarely perfectly straight.
- Ceiling height — determines the maximum height for tall cabinets and the gap between base and wall units.
- Obstacles — windows, pipes, electrical outlets, radiators, and structural columns all affect cabinet placement and sizing.
- Appliance openings — dishwasher (typically 600mm wide), oven, fridge, and cooktop all require specific clearances.
Standard kitchen cabinet dimensions provide a useful starting point:
- Base cabinets: 600mm deep × 870mm high (including 150mm kick board), widths from 300mm to 900mm
- Wall cabinets: 300mm deep × 720–900mm high, mounted 450–500mm above the countertop
- Tall cabinets: 600mm deep × 2100mm high (pantry) or sized to match your oven tower requirements
Leave 2–3mm gaps between adjacent cabinets and the wall for fitting adjustments. These tolerances seem small, but forgetting them across a run of 10 cabinets adds up to 20–30mm of error — enough to prevent the last cabinet from fitting.
Step 2 — Plan Your Cabinet Layout
With measurements in hand, sketch your kitchen layout and assign a cabinet type to each position. Common cabinet types include:
Base cabinets:
- Standard single-door (300mm, 400mm, 450mm, 500mm, 600mm widths)
- Sink base (typically 800mm or 900mm, with cutout for plumbing)
- Drawer unit (three or four drawers, usually 400mm–600mm wide)
- Corner base (L-shaped or blind corner, 900mm × 900mm footprint)
Wall cabinets:
- Standard single or double door
- Corner wall unit
- Above-fridge cabinet (shorter height, wider span)
Tall cabinets:
- Pantry/larder (full height, multiple shelves)
- Oven tower (housing for built-in oven and microwave)
Number each cabinet in your layout sketch — you'll reference these numbers in the cut list to keep parts organized. A typical L-shaped kitchen might have 12–16 base cabinets, 8–12 wall cabinets, and 1–2 tall units, producing 150–250 individual parts across all material groups.
Step 3 — List Every Part
Work through your layout cabinet by cabinet. For each unit, list every component with its exact width and height. Here's an example for a standard 600mm base cabinet in 18mm plywood:
- 2× Side panels: 564mm × 770mm
- 1× Bottom panel: 564mm × 564mm
- 1× Top stretcher (front): 564mm × 100mm
- 1× Top stretcher (back): 564mm × 100mm
- 1× Shelf: 560mm × 540mm
In 6mm plywood or hardboard:
- 1× Back panel: 598mm × 768mm
Notice that the side panel depth (564mm) accounts for the 18mm back inset if you're using a rebated back, and the bottom width deducts the two side thicknesses (600mm − 2 × 18mm = 564mm). Getting these deductions right is critical — mixing up inside and outside dimensions is the most common mistake in cabinet cut lists.
Don't forget these commonly overlooked parts:
- Filler strips — used to close gaps between the last cabinet and the wall (typically 50–100mm wide)
- End panels — decorative panels that cover exposed cabinet sides, often in a nicer material
- Kick boards (plinths) — 150mm × cabinet width, cut from offcuts or a separate sheet
- Drawer components — easy to undercount; multiply by the number of drawers
Group all parts by material and thickness. Your final list might have three groups: 18mm plywood carcass parts, 6mm hardboard backs, and 18mm MDF door panels. Each group will be optimized separately against its own stock sheet size.
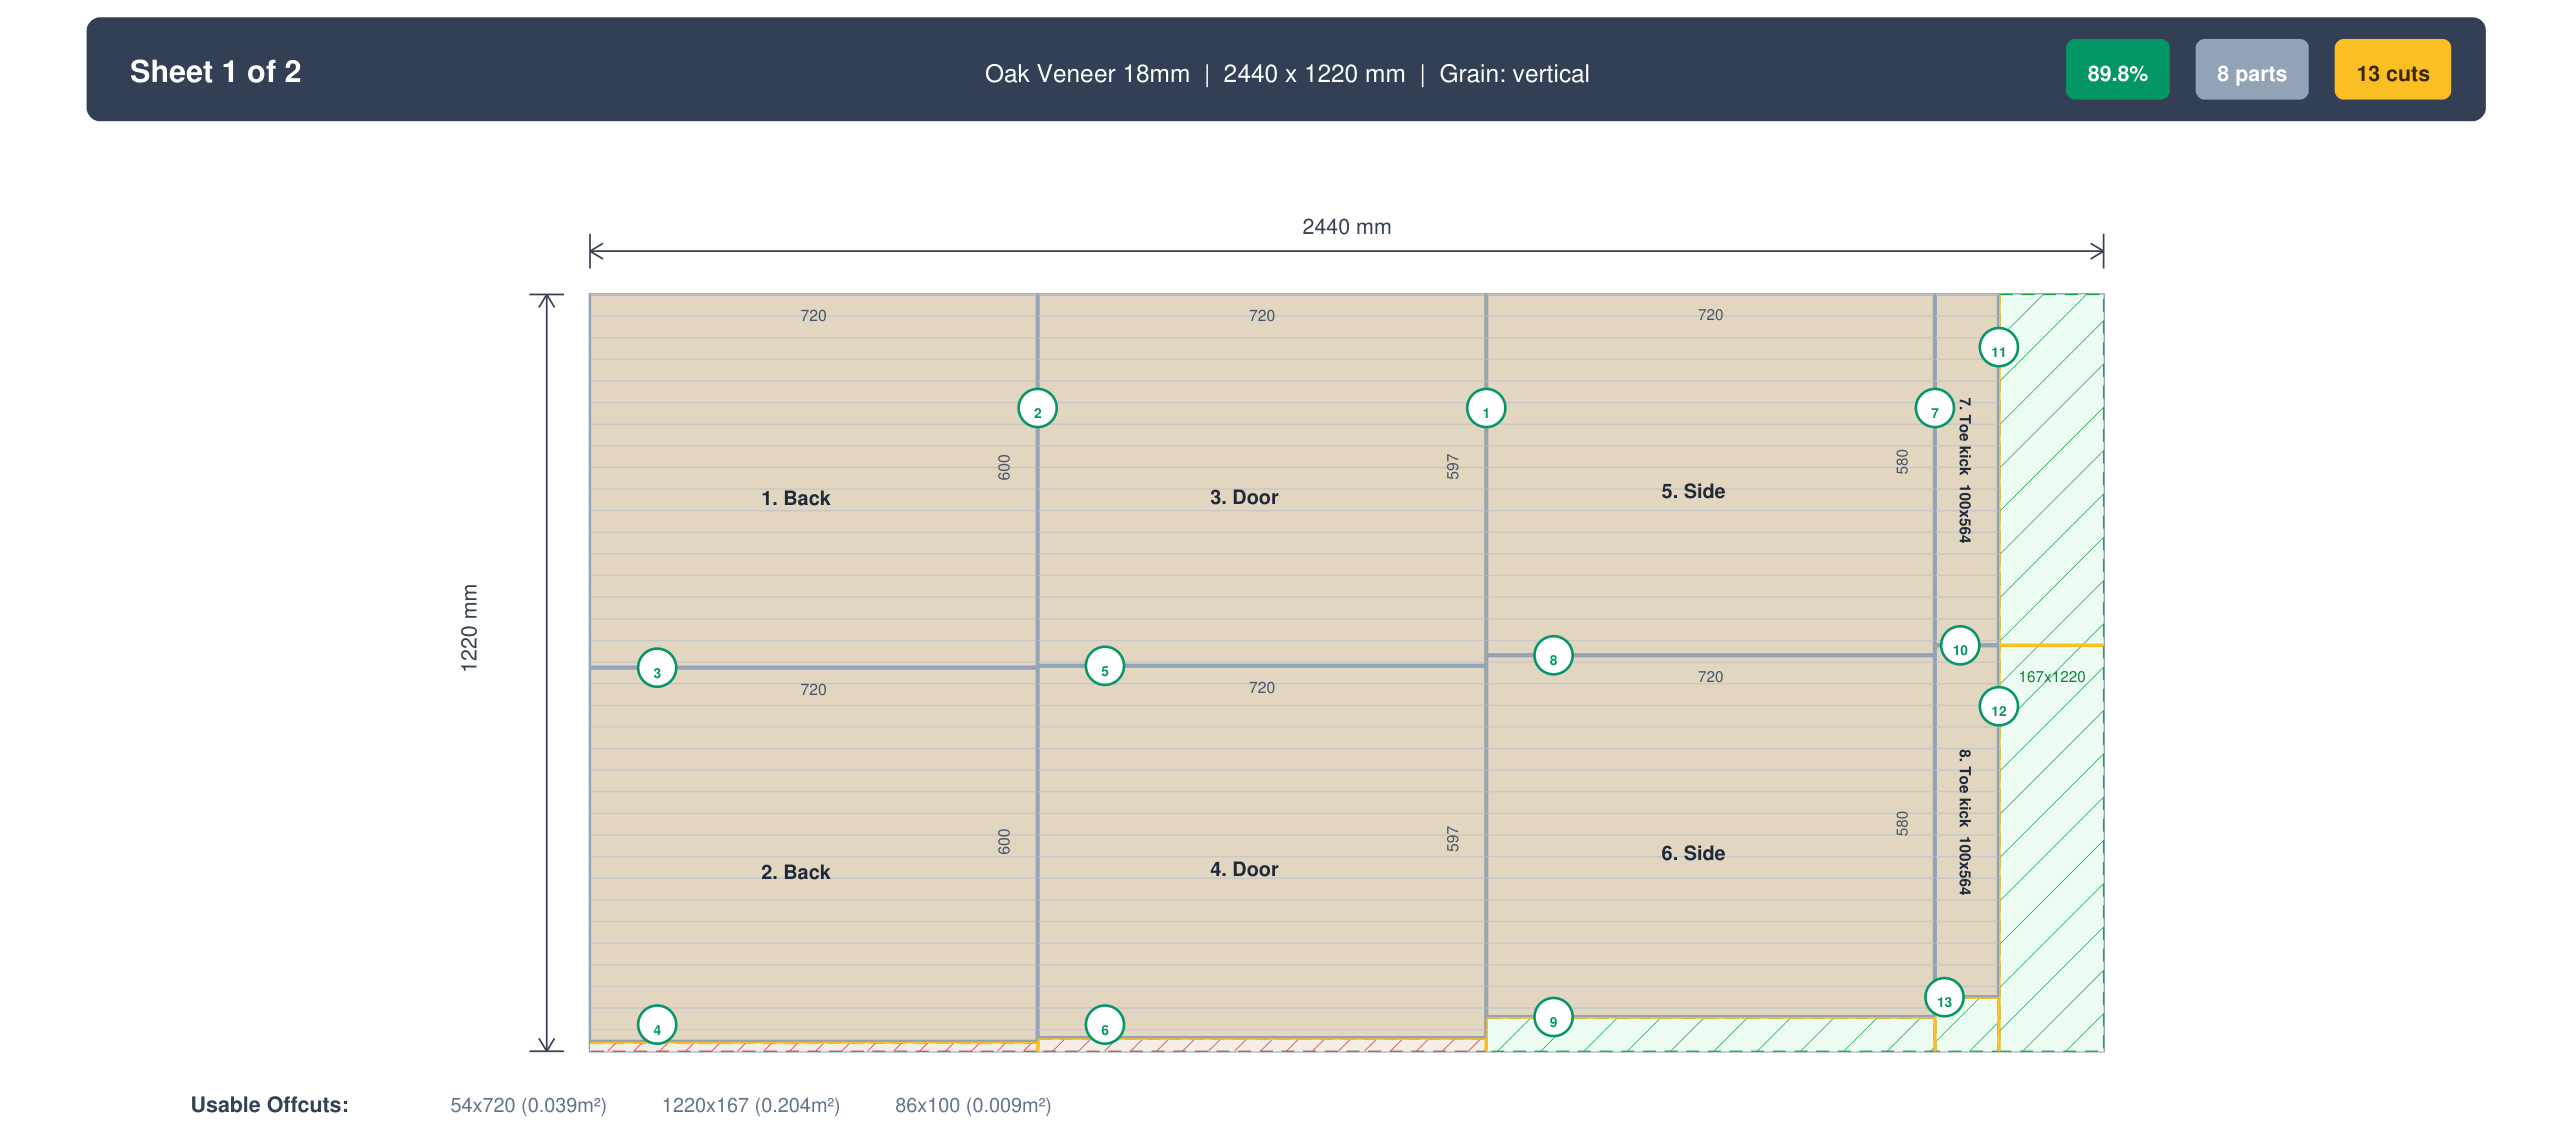
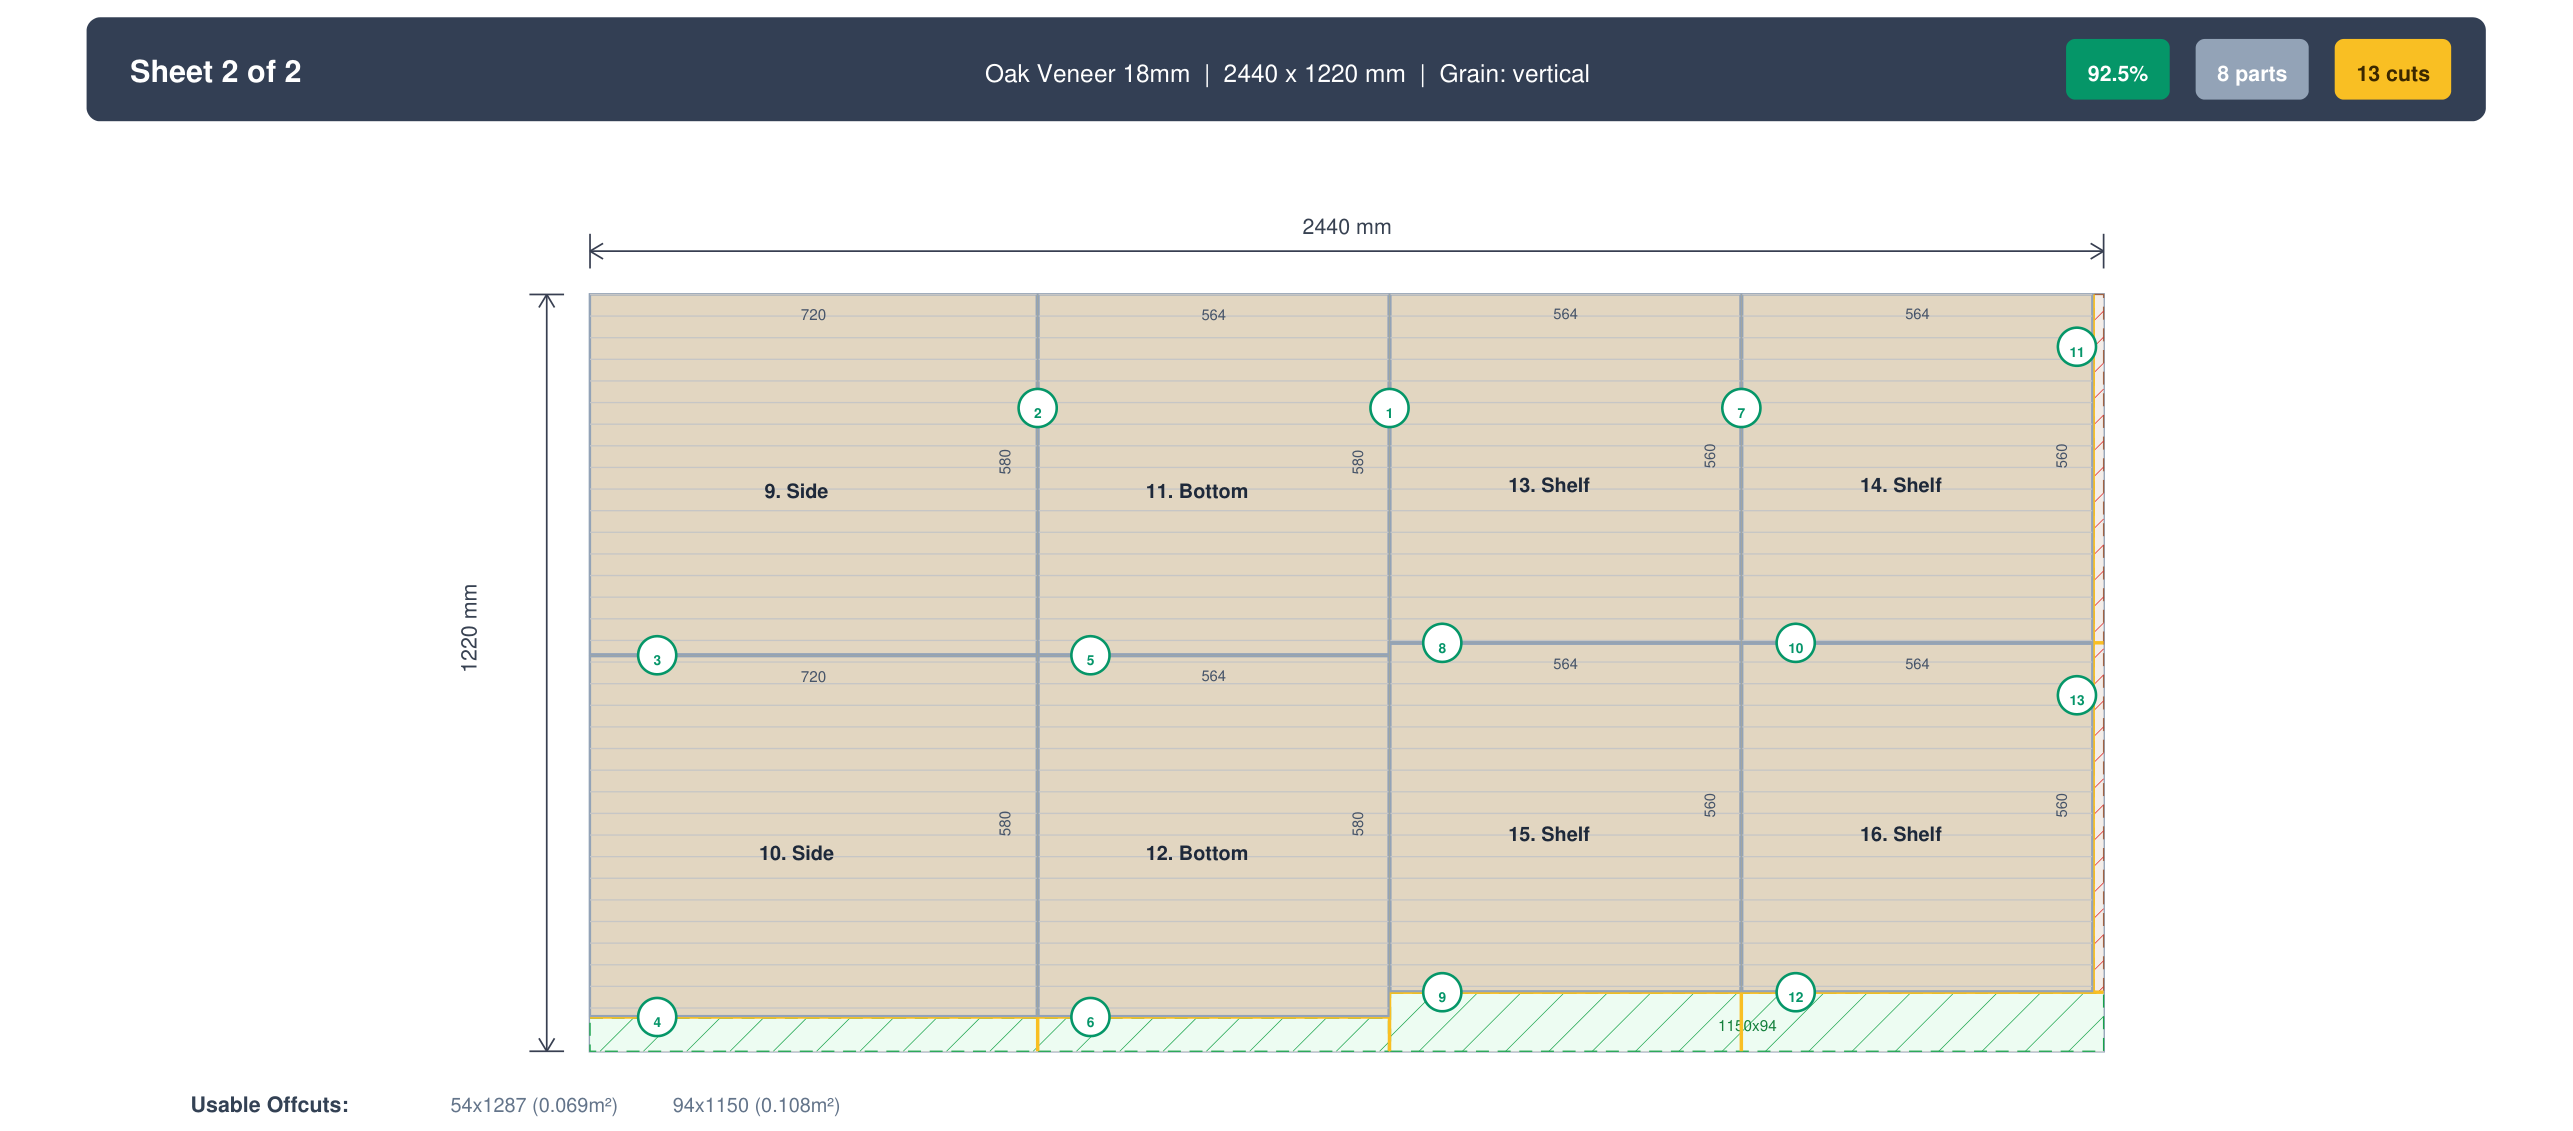
Step 4 — Optimize with Software
With a complete parts list in hand, the next step is to arrange those parts onto stock sheets with minimal waste. Doing this manually for 200+ parts is impractical — a single kitchen can require 8–12 sheets of 18mm material alone. This is where a cut list optimizer saves hours of work and significant material cost.
To optimize your kitchen cabinet cut list in CutPlan:
- Enter your parts grouped by material and thickness. Name each part with its cabinet number for easy identification (e.g., "B3-Side", "W5-Shelf").
- Set stock sheet dimensions. The standard in most regions is 2440 × 1220mm, but check your supplier — sheet sizes vary by country.
- Set your saw kerf width. Typically 3mm for a standard table saw blade, 4mm for panel saws. This ensures the optimizer accounts for the material lost to each cut.
- Lock grain direction on visible parts — cabinet sides, end panels, and door fronts. Leave internal parts (shelves, stretchers, backs) rotation-free to improve yield.
- Run the optimization. CutPlan will calculate the most efficient arrangement and tell you exactly how many sheets you need.
A well-optimized kitchen cut list typically achieves 85–92% material utilization. Without optimization, manual layouts often waste 25–35% of each sheet. On a 10-sheet kitchen project with plywood at $60–$80 per sheet, that's a potential saving of $150–$280 — more than enough to justify the few minutes spent in the optimizer.
Step 5 — Export and Cut
Once you're satisfied with the layout, export your cutting diagrams for the workshop:
- PDF export — ideal for manual cutting with a table saw or panel saw. Print one page per sheet with part labels and dimensions clearly marked.
- DXF export — for CNC routers and beam saws. The DXF file contains exact coordinates that the machine reads directly. CutPlan's DXF export is compatible with most CNC controllers.
- CSV export — useful for sharing the parts list with a supplier who will do the cutting for you.
Before cutting, label every part on the layout diagram with its cabinet number and position (e.g., "B3-Left Side"). Transfer these labels to the physical panels as you cut them — this prevents confusion during assembly when you have dozens of similar-looking rectangles on the workshop floor.
Cut the carcass panels first, then backs, then doors. Save offcuts from the 18mm sheets for kick boards and filler strips — these small parts often fit neatly into the waste areas the optimizer couldn't fill with larger components.
Common Mistakes to Avoid
After optimizing hundreds of kitchen cabinet projects, these are the errors we see most often:
- Forgetting edging thickness. If you're applying 1mm or 2mm edge banding, deduct it from the part dimensions before entering them into the optimizer. A 600mm part with 2mm edging on both ends should be entered as 596mm.
- Mixing inside and outside dimensions. Decide upfront whether your measurements are overall (outside) or internal (between the sides). Be consistent across every cabinet — one miscalculation cascades through every part in that unit.
- Not grouping by material. Entering 18mm plywood parts and 6mm hardboard parts in the same optimization run will produce unusable results. Always separate by material and thickness.
- Ignoring colour/batch matching. Sheets from different batches may have slightly different tones. Order all sheets from the same batch and mark them before cutting.
- No allowance for test cuts. Always add 1–2 extra parts for test fitting, especially for drawer slides and hinge mounting. It's cheaper to cut a spare side panel than to waste a full sheet because one was misdrilled.
- Forgetting drawer parts. A four-drawer cabinet adds 20 individual parts (5 per drawer). It's easy to undercount when you're focused on the carcass.
Dolap Kesim Listenizi Planlamaya Hazır mısınız?
Dolap parçalarınızı CutPlan'a girin ve saniyeler içinde optimize edilmiş kesim düzenleri alın — aylık 30 hesaplamaya kadar ücretsiz.
Optimizatörü Aç →Sıkça Sorulan Sorular
10 mutfak dolabı için kaç levha kontrplak gerekir?
Dolap boyutuna göre değişir, ancak kabaca gövdeler için 6-8 levha 18mm kontrplak ve arkalar için 2-3 levha ince malzeme gerekir.
Dolap gövdesi için kontrplak mı MDF mi kullanmalıyım?
Kontrplak daha güçlüdür, vidaları daha iyi tutar ve neme dayanıklıdır — dolap kutuları için tercih edilen seçimdir.
Dolap yan panelleri için hangi damar yönünü kullanmalıyım?
Dolap yan panellerinde damar hem görsel görünüm hem de yapısal dayanıklılık için dikey yönde olmalıdır.