Plywood Cut List Optimization: How to Lay Out Parts for Maximum Efficiency
Plywood cut list optimization is the process of arranging every part your project needs onto full sheets so you use the fewest sheets and leave the least waste. The fastest way to do it well: list your finished part sizes, lock grain direction only where the face will show, set your saw kerf and edge trim, then let a layout optimizer nest the parts and hand you a numbered cut sequence. Done by hand, a single cabinet run can eat an hour of graph-paper juggling; done properly it takes about two minutes and routinely saves a full sheet.
This guide walks the whole workflow on a real bookcase, then digs into the plywood-specific details that a generic nesting article skips: how sheet grain and veneer faces change your layout, why 18 mm plywood is rarely exactly 18 mm, how much to oversize parts, and the mistakes that quietly cost you a sheet. If you want the broader theory first, the complete guide to cut list optimization covers the fundamentals; this post is the hands-on plywood version.
Why plywood is its own optimization problem
Solid lumber you can rip and crosscut to almost any size and glue up to width. Plywood does not work that way. It arrives in fixed sheets, the face veneer has a grain direction you often need to respect, and every cut you make is permanent: there is no jointing a bad edge back to square without losing width. That combination means the order and orientation of your cuts matters as much as the raw area you need.
Three constraints drive every plywood layout:
- Fixed stock size. You buy whole sheets, so waste is measured against the full sheet area, not against some ideal blank.
- Grain and face direction. On a bookcase side or a cabinet door, the visible veneer grain should run the right way. Lock it there and let everything else rotate freely.
- Guillotine cutting. A table saw, tracksaw, or panel saw cuts edge to edge in a straight line. Parts that require a cut to stop in the middle of the sheet cannot be produced that way. If this is new, the guillotine vs free cut explainer shows why it changes the layout.
The example project: a simple bookcase
We will optimize a cut list for a floor-standing bookcase with three adjustable shelves, all in 18 mm birch plywood, with a 6 mm plywood back. Here is the full part list with finished sizes:
| Part | Length (mm) | Width (mm) | Qty | Grain |
|---|---|---|---|---|
| Side panel | 1800 | 300 | 2 | Vertical |
| Top panel | 800 | 300 | 1 | Horizontal |
| Bottom panel | 800 | 300 | 1 | Horizontal |
| Fixed shelf | 764 | 290 | 1 | None |
| Adjustable shelf | 764 | 285 | 3 | None |
| Back panel (6 mm ply) | 1800 | 800 | 1 | Vertical |
Stock: standard 2440 x 1220 x 18 mm birch plywood. We will use a 3 mm saw kerf and a 5 mm trim off each edge of the sheet. The 6 mm back panel is a different material and gets its own sheet, so it never competes with the 18 mm parts for space.
Step 1: Enter the parts
Open CutPlan in your browser, nothing to install. In the Parts panel, add each row from the table. Four fields matter:
- Label: the part name, so the layout and PDF are readable ("Side panel", not "Part 4").
- Length x Width: the finished size after cutting.
- Qty: identical pieces; the two side panels are one row with Qty 2.
- Grain: vertical, horizontal, or none. Set "none" for anything hidden so the optimizer can rotate it.
On the bookcase, only the sides and the top and bottom really need grain locked, because they show. The shelves sit inside and can rotate freely, which is exactly the flexibility the optimizer needs to fill gaps.
Step 2: Set up your stock sheets
In the Stock panel, add the 18 mm birch sheet: length 2440, width 1220, quantity 3 to start, grain running along the 2440 mm length (which is how most face-grade plywood is oriented). Add the 6 mm back panel as a separate 2440 x 1220 stock item with its own material name.
If you keep offcuts from earlier jobs, add them here too as extra stock. Feeding real leftovers into the layout is the single easiest way to cut your sheet count, a habit worth building, and the offcut management guide covers how to track them so they actually get used instead of leaning against a wall for a year. For the standard sheet dimensions in your region, the standard sheet sizes guide lists metric and imperial stock.
Step 3: Configure kerf, trim, and grain
In the Options panel:
- Kerf: 3 mm. This is the width the blade removes. A thin-kerf tracksaw blade is closer to 2 mm; a standard table saw blade is 3 to 3.2 mm. Guess low and your parts come out undersized. If kerf is unfamiliar, saw kerf explained shows why it compounds across a sheet.
- Stock trim: 5 mm per edge. Sheet edges arrive dinged and rarely dead square, so a clean-up cut on all four sides is standard practice for anything visible.
- Units: mm. Switch to inches if you work imperial; the math is identical.
- Grain matching: on. Parts obey their grain setting; "none" parts rotate.
Kerf matters more than beginners expect. On our bookcase, a single sheet holds roughly a dozen cuts. At 3 mm each, that is around 36 mm of material vanishing as sawdust before a single part is oversized: enough to tip a tight layout from two sheets onto three if you ignore it.
Step 4: Calculate and read the layout
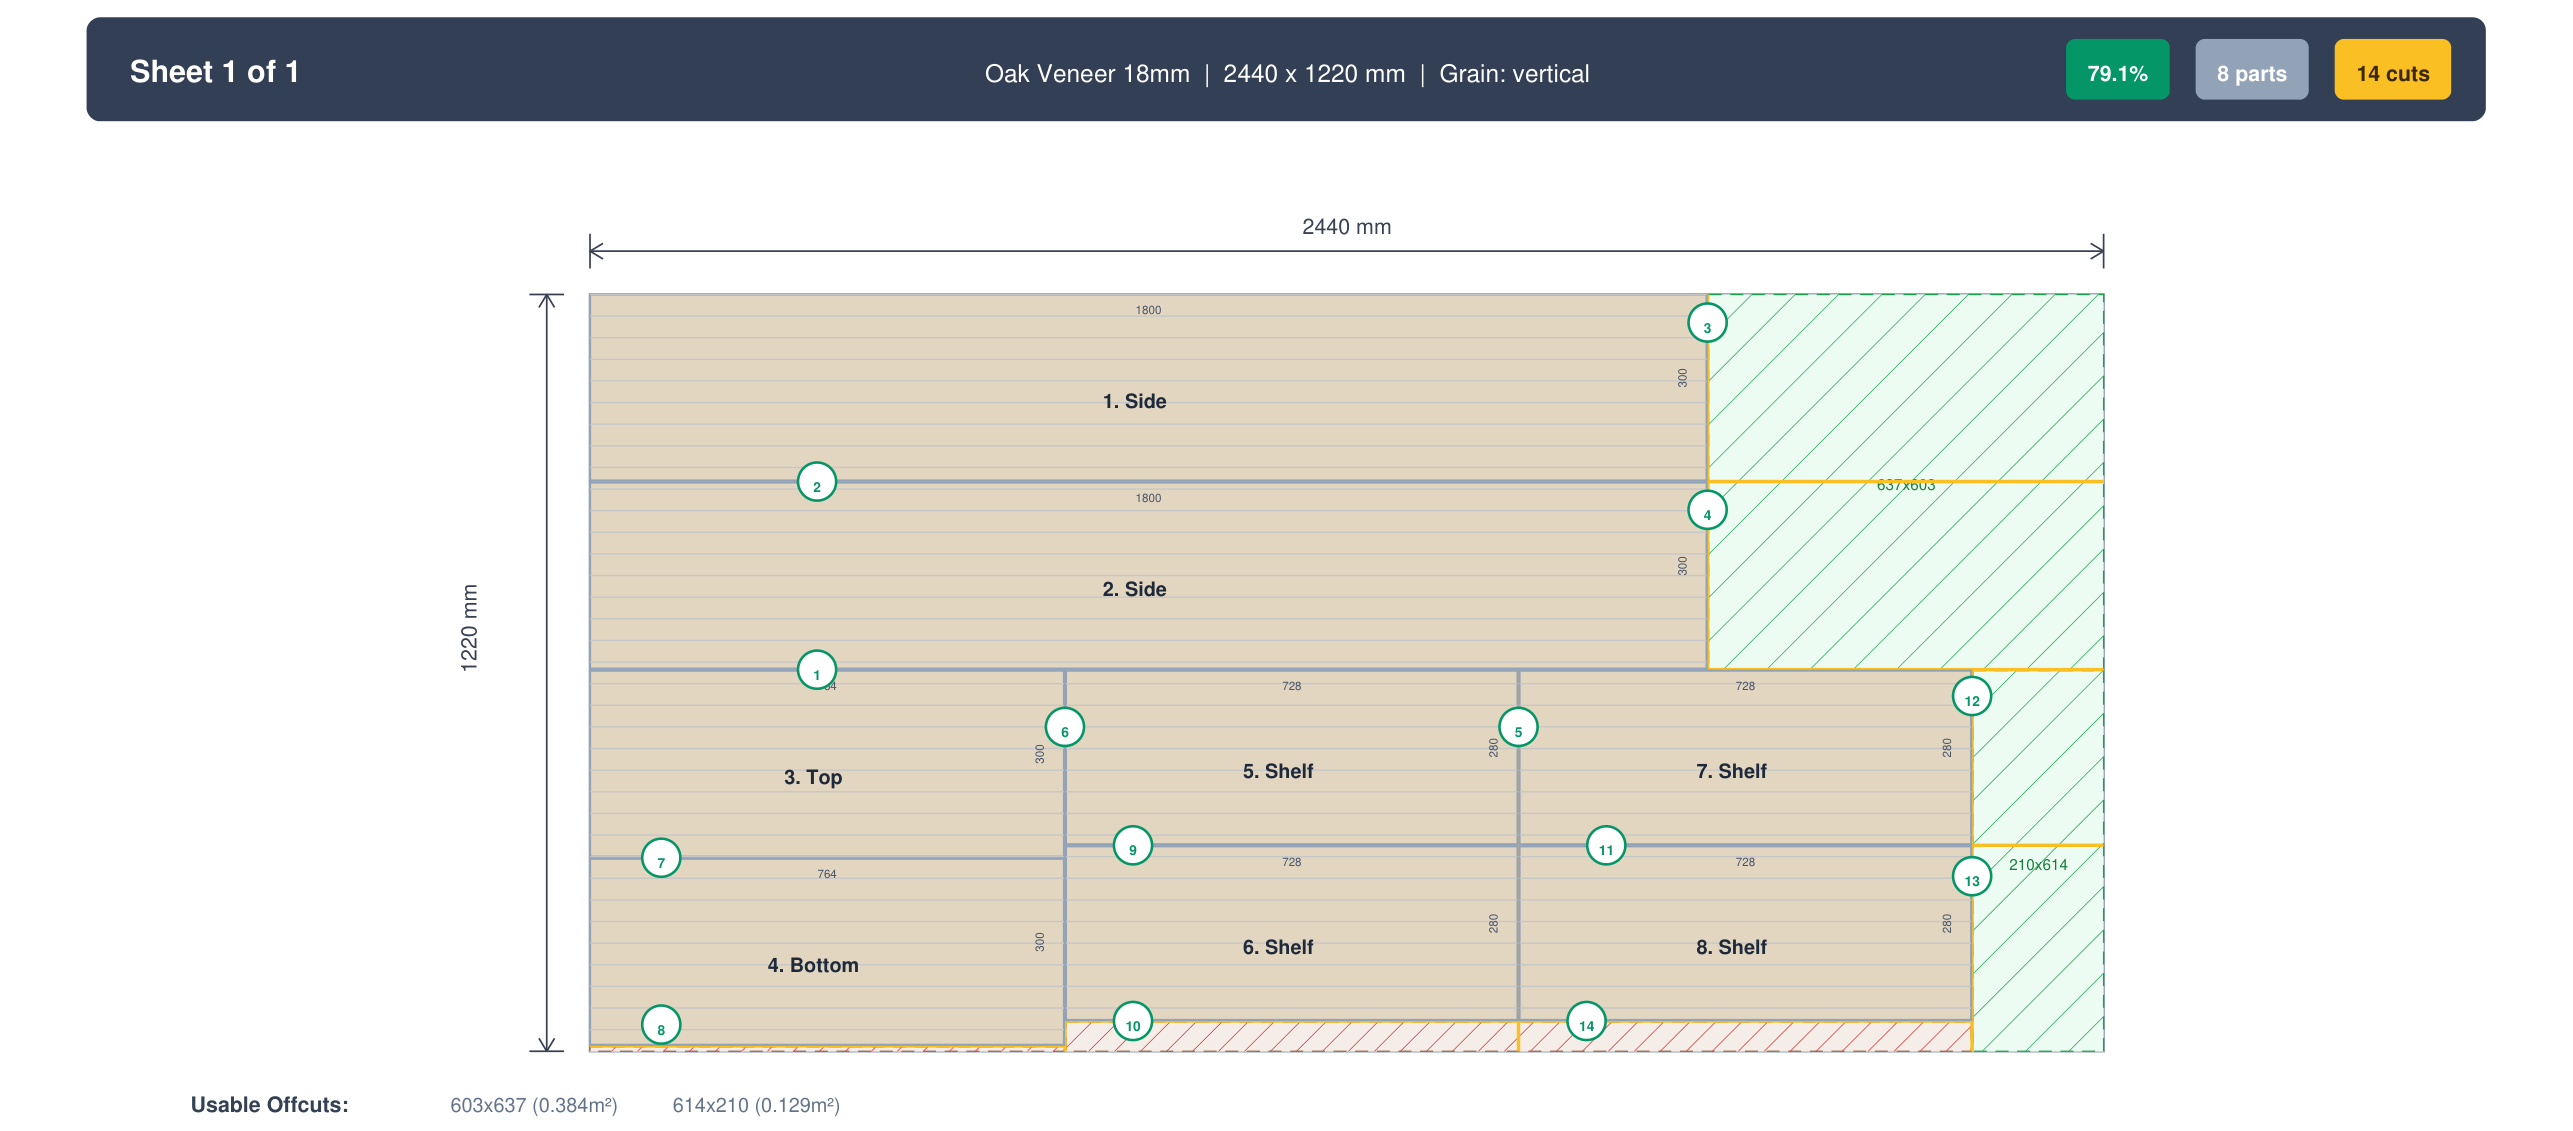
Press Ctrl+Enter or click Calculate. The optimizer runs more than 120 packing strategies across four engines in one to three seconds and shows the best scoring result. For this bookcase you should land on:
- All nine 18 mm parts on 2 sheets, plus the 6 mm back on its own sheet.
- Waste around 10 to 14 percent on the 18 mm sheets, typical for furniture with grain locked on the big panels.
- Both 1800 mm side panels standing vertically to keep face grain running top to bottom.
- Shelves tucked into the strip beside the sides, rotated to fit.
The layout is color coded, each part labeled with its cut size. Hover a part to highlight its position. If a part will not fit at all, it is flagged rather than silently dropped, so you know to add stock or split a panel.
Step 5: Check the cut steps before you cut anything
Turn on Cut Steps in the results toolbar. This generates a numbered guillotine sequence: the exact order of edge-to-edge cuts that isolates each part. It matters most on a panel saw or sliding table saw, where every cut must run fully across the piece. Following the sequence means you break the sheet down into manageable sub-panels first, then into parts, rather than trapping a part behind a cut you can no longer reach.
Hover a step to animate its cut line on the diagram. Reading the sequence once at the bench prevents the classic mistake of cutting a shelf free before you have ripped the long strip it lives in.
Step 6: Handle edge banding
Exposed plywood edges usually get banded to hide the plies. In CutPlan you flag which edges of each part get banding (top, bottom, left, right). The optimizer then adds the banding thickness to the cut size, draws the banded edges as colored lines on the layout, and totals banding length in the PDF so you know how much to buy. On the bookcase, the front edge of each shelf and the front edges of the sides typically get one strip. The dedicated edge banding guide covers material choice and application if you are new to it.
Step 7: Export the workshop PDF
When the layout looks right, click Export PDF. You get a clean cut sheet: scaled sheet diagrams with dimensions, the numbered cut sequence per sheet, a part list with cut sizes and materials, and a waste and material summary. Print it, take it to the saw, and cut in the order shown. If you want to know what a good cut sheet should contain, PDF cut sheets explained breaks down each section.
Reading your waste percentage
Waste percentage is the share of purchased sheet area that ends up as scrap. Use it as a sanity check, not a target to obsess over: some waste is unavoidable when parts do not tile evenly.
| Waste % | Assessment | Typical cause |
|---|---|---|
| 0 to 8% | Excellent | Parts nest tightly, most rotation allowed |
| 8 to 15% | Good | Normal for furniture with grain locked on big panels |
| 15 to 25% | Acceptable | Awkward part sizes or strict grain matching |
| 25%+ | Review | Reconsider sheet size, part sizes, or grain rules |
If you land above 25 percent, add a smaller stock size such as a half sheet (1220 x 610 mm) so the optimizer can catch leftovers more efficiently, or relax grain on parts that do not truly need it. For a deeper treatment of squeezing every sheet, see how to minimize wood waste in panel cutting.
Plywood details that change the layout
18 mm is rarely 18 mm. Nominal 18 mm birch often measures 17.3 to 17.8 mm; imperial 3/4 in sheets can run 18.0 to 18.5 mm. This does not change the flat layout, but it wrecks joinery if you cut dadoes sized for the nominal number. Measure a sample of your actual stock and size grooves to it, not to the label.
Grain runs down the length by default. On most face-grade sheets the visible grain runs parallel to the 2440 mm side. Locking a side panel to "vertical" means its long axis should follow that grain. If your sheet is cross-grained (some cheaper hardwood ply is), flip your grain assumptions or the optimizer will orient against the veneer.
Face quality has a good side. Cabinet-grade plywood is graded per face (for example B/BB): one better face, one lesser. For visible parts, keep the good face oriented consistently. The optimizer handles the flat nesting; you handle which way up each blank goes at the saw.
Book-matching across a run. If several doors or panels should share continuous grain, they need to come from adjacent areas of the same sheet in sequence. That is a manual override on the layout, not something pure area-minimization will do for you: a reminder that the optimizer serves the design, not the other way around. For the full picture of when grain is worth the extra sheet, read grain direction in panel cutting.
Common plywood cut list mistakes
- Forgetting kerf. The most common cause of parts coming out a few millimeters short across a sheet. Set it once and let the tool carry it.
- Locking grain on hidden parts. Setting every part to "vertical" out of habit strips the optimizer of rotation and can add a whole sheet. Lock grain only where the veneer shows.
- Mixing materials on one sheet. The 6 mm back and the 18 mm carcass are different stock. Keep them as separate materials or the layout is meaningless.
- Ignoring the cut sequence. A perfect flat layout you cannot physically cut on your saw is worthless. Check the guillotine steps against your equipment.
- Sizing joinery to nominal thickness. Cut your grooves to the sheet you actually own.
For a broader catalog across all panel work, the common cut list mistakes post is a useful pre-flight checklist. If you are cutting a full run of cabinets rather than a single bookcase, the kitchen cabinet cut list guide scales this same workflow up.
Key takeaways
- Enter finished dimensions and let the optimizer add kerf and trim.
- Lock grain only on parts whose face will show; leave the rest free to rotate.
- Keep different thicknesses as separate materials so they do not fight for space.
- Read the guillotine cut sequence before cutting, and check it against your saw.
- Measure your real sheet thickness; nominal 18 mm rarely is.
- Export a PDF cut sheet and cut in the order shown; if waste tops 25 percent, add a half-sheet option.
Optimize your plywood cut list now
Free, browser based, no account required. Enter your parts and get a PDF cut sheet in under two minutes.
Open Optimizer →Frequently Asked Questions
How do I optimize a plywood cut list to use the fewest sheets?
List every part at its finished size, lock grain only on parts whose face shows, set your saw kerf and edge trim, then run a layout optimizer. It nests the parts across full sheets, tells you the exact sheet count, and gives a cut sequence. For the bookcase in this guide, nine 18 mm parts fit on two sheets plus one sheet for the 6 mm back. Doing it in software takes about two minutes and typically saves a full sheet over eyeballing it.
Should I enter finished sizes or cut sizes for plywood parts?
Enter finished sizes, the dimensions the part needs to be after all cutting. A good optimizer automatically adds the saw kerf between parts and the trim off each sheet edge. If you pre-add kerf or trim to your part sizes yourself, you double-count and the parts come out oversized or you run short on the sheet. The only thing you add manually is a machining allowance if you plan to trim a part again after assembly.
Why does grain direction matter for a plywood cut list?
The face veneer on cabinet-grade plywood has a visible grain direction. On parts that show, such as cabinet sides, doors, or a bookcase top, the grain should run the intended way, so you lock those parts to vertical or horizontal. That constraint removes the optimizer's freedom to rotate them, which can raise your sheet count. Parts that stay hidden, like interior shelves, should be set to "none" so they rotate freely and fill gaps. Lock grain only where it truly shows.
How much waste is normal when cutting plywood?
For furniture with grain locked on the large panels, 8 to 15 percent waste is good and expected. Below 8 percent is excellent and usually means parts nest tightly with lots of rotation allowed. Between 15 and 25 percent is acceptable when part sizes are awkward. Above 25 percent, revisit your setup: add a smaller stock size to catch leftovers, relax grain on hidden parts, or adjust part dimensions slightly if the design allows.
Is 18 mm plywood actually 18 mm thick?
Usually not exactly. Nominal 18 mm birch plywood often measures 17.3 to 17.8 mm, and imperial 3/4 inch sheets can run 18.0 to 18.5 mm depending on species and origin. It does not affect the flat cut layout, but it matters for joinery: cut dadoes and grooves to the thickness of the sheet you actually own, not the number on the label. Measure a sample before setting up any groove.
Can I use offcuts from previous jobs in a new plywood layout?
Yes, and it is the easiest way to cut your sheet count. Add each usable offcut as a stock item with its real dimensions and matching material, and the optimizer will place parts on it before reaching for a fresh sheet. Track your offcuts so they actually get used rather than piling up. Feeding leftovers back into the layout routinely saves a whole sheet on a mid-size project.