The Complete Guide to Cut List Optimization (2026)
Cut list optimization is the process of arranging parts on stock material — such as plywood sheets, glass panels, or metal plates — to minimize waste and reduce material costs. Also known as the 2D cutting stock problem, it uses algorithms to find the most efficient layout for your parts. Whether you're a hobbyist building your first bookshelf or a professional cabinet shop cutting 50 sheets a week, understanding how optimization works will save you time, money, and material.
What Is Cut List Optimization?
Every project that involves cutting parts from sheet material starts with the same challenge: you have a list of parts you need and a supply of stock sheets to cut them from. The goal is to fit all parts onto the fewest possible sheets with the least leftover waste.
Consider a real-world example. You're building a set of kitchen cabinets and need 24 parts — side panels, shelves, backs, and doors — across three different material thicknesses: 18 mm plywood for the carcasses, 6 mm hardboard for the backs, and 16 mm melamine for the shelves. Each material comes in standard 2440 × 1220 mm (8 × 4 ft) sheets.
Manually arranging 24 parts across three materials on paper takes 30–60 minutes, and even an experienced woodworker typically wastes 15–25% of the sheet area. An optimizer does the same job in under 5 seconds and typically achieves 5–12% waste — saving one or two full sheets on a project this size.
Mathematically, this is a variant of the 2D bin packing problem, which is classified as NP-hard. That means there's no known algorithm that can guarantee the absolute best solution in a reasonable time for large inputs. Instead, optimizers use heuristic strategies — smart shortcuts that find excellent (near-optimal) solutions quickly. The good news: modern heuristics get within 1–3% of the theoretical optimum on typical woodworking projects, which is far better than any human can achieve manually.
The concept applies universally across industries. Furniture makers optimize plywood and MDF. Glass fabricators optimize window panels. Metal shops optimize steel plates for CNC plasma cutting. The materials and machines differ, but the underlying math — fitting rectangles onto rectangles with minimal waste — is identical. This guide covers everything from the basics to advanced techniques, with links to detailed deep-dives on every specific topic.
Key Concepts You Need to Know
Before diving into algorithms and software, here are the terms you'll encounter in any cut list optimizer:
Stock Sheets
The raw material you're cutting from. Standard sheet sizes vary by region and material — 2440 × 1220 mm (8 × 4 ft) in North America, 2800 × 2070 mm in much of Europe, and 1525 × 1525 mm (5 × 5 ft) in parts of Asia. Knowing your local standard sizes is the first step in any optimization, so consult our standard sheet sizes guide for a complete reference by material and region. You can also add non-standard sizes — such as offcuts from previous projects — as available stock.
Parts (Pieces)
The individual components you need. Each part has a length, width, quantity, and optionally a material assignment, grain direction, and edge banding specification.
Saw Kerf
The width of material removed by the saw blade — typically 2.5–4 mm for table saws and 5–8 mm for some panel saws. This small value compounds quickly: 10 crosscuts with a 3 mm kerf removes 30 mm of usable material. A good optimizer accounts for kerf between every adjacent cut. Getting kerf wrong is one of the most common sources of undersized parts — our saw kerf guide explains how to measure your blade and set the correct value.
Grain Direction
When panel aesthetics matter — for example, visible cabinet doors or furniture tops — parts must be oriented so the wood grain runs in a specific direction. This constrains rotation and typically increases waste by 5–15%, but ensures visual consistency. Knowing when to lock grain and when to allow free rotation is a critical skill — read our deep dive on grain direction in panel cutting for practical guidelines. CutPlan's grain direction feature handles this automatically on a per-part basis.
Edge Banding
A thin strip of material (PVC, veneer, or ABS) applied to exposed panel edges for a finished look. Edge banding has its own thickness (typically 0.5–2 mm) that slightly changes the net part dimensions. If you use thick banding (1 mm+), the optimizer needs to account for this to avoid parts that don't fit after banding is applied. Our edge banding guide covers types, application methods, and how banding thickness affects your cut list.
Offcuts and Remnants
Leftover pieces from previous cuts that may still be large enough to use. Adding offcuts as available stock is one of the easiest ways to improve yield. Track them, label them with dimensions and material type, and feed them back into your next optimization. A systematic approach can reduce your material costs by 10–20% over time — see our offcut management guide for a complete tracking workflow.
How Cut List Optimization Algorithms Work
Optimization software doesn't just randomly place parts on sheets. It follows structured strategies, testing many arrangements and picking the best one. Here are the main approaches:
First Fit Decreasing (FFD)
The simplest heuristic. It sorts all parts from largest to smallest, then places each part on the first sheet where it fits. It's fast — typically under 100 milliseconds even for hundreds of parts — and produces reasonable results. However, it rarely achieves optimal packing because it doesn't consider how later parts might fit better with a different arrangement of earlier ones. Think of it as a greedy algorithm: good at each individual step, but missing the bigger picture.
Best Fit
Instead of placing a part on the first available sheet, Best Fit finds the sheet where the part leaves the least remaining space. This tends to fill sheets more completely, reducing the number of partially-used sheets. The improvement over FFD is typically 2–5% less waste, at a negligible speed cost. Best Fit is a good default for simple projects with fewer than 20 parts.
Guillotine Cutting
A constraint rather than a strategy. Guillotine cuts must go completely from one edge to the other — you can't cut a rectangle from the middle of a sheet. This is a practical requirement for table saws and panel saws where the blade passes through the entire panel. Most workshop-oriented optimizers enforce guillotine constraints, since that's how real cuts happen on these machines. For a detailed comparison of how guillotine and free cutting differ in practice, see our guide on guillotine cut vs free cut.
Free Cutting / Nesting
Parts can be placed anywhere on the sheet, including in spaces that require non-through cuts. This is used for CNC routers and laser cutters, where the cutting head can start and stop anywhere. Nesting produces tighter layouts with less waste, but the results only work on CNC equipment. If you're deciding between manual cutting and CNC nesting, our CNC nesting vs manual cut list comparison breaks down the cost, yield, and equipment tradeoffs.
Multi-Strategy Optimization
The best tools — including CutPlan — don't rely on a single algorithm. Instead, they run multiple strategies in parallel (CutPlan tests 15 different approaches) and return the result with the lowest waste. This "tournament" approach consistently outperforms any single heuristic because different strategies excel on different part mixes. A project with many small parts might pack best with one approach, while a project with a few large parts and many small ones might benefit from a completely different strategy. By running all 15 and picking the winner, you get the best of all worlds without having to understand which algorithm is best for your specific case.
| Strategy | Speed | Waste | Guillotine? | Best For |
|---|---|---|---|---|
| First Fit Decreasing | Very fast | 12–20% | Yes | Quick estimates |
| Best Fit | Fast | 10–16% | Yes | Simple projects |
| Guillotine recursive | Medium | 6–12% | Yes | Table saw / panel saw |
| Free nesting | Medium | 4–8% | No | CNC routers |
| Multi-strategy (15×) | 1–5 sec | 5–10% | Both | All use cases |
Materials That Benefit from Cutting Optimization
Cut list optimization isn't just for woodworking. Any industry that cuts rectangular parts from flat sheet stock benefits from the same approach.
Wood and Wood-Based Panels
The most common use case. Plywood, MDF, melamine-faced particle board, OSB, and hardboard are all used in furniture, cabinetry, shelving, and construction. Grain direction and edge banding are wood-specific constraints that a good optimizer handles natively. If you're working specifically with plywood for a furniture project, our plywood cut list optimization tutorial walks through the complete process from design to workshop.
Glass
Architectural glass, mirrors, shower panels, and tabletops. Glass cutting differs from wood in several important ways — kerf is effectively zero (score-and-snap), coated glass has an orientation constraint similar to grain, and minimum remnant sizes matter since small glass offcuts are fragile and dangerous to handle. Our glass cutting optimization guide covers the specific settings and techniques.
Metal
Sheet metal, aluminum composite panels (ACM), steel plates, and copper sheets. Metal cutting often uses CNC laser or plasma, so nesting (free cutting) applies. Kerf varies significantly by process — 0.2 mm for fiber laser, 2–3 mm for plasma, 1–2 mm for waterjet. Metal stock costs $2–10+ per kg, making optimization especially valuable. Our sheet metal nesting guide covers CNC considerations and cost savings for fabrication shops.
Other Materials
Acrylic and polycarbonate sheets, foam board, composite panels, ceramic tiles, and even fabric (roll cutting). The optimization math is the same — only the constraints differ. Acrylic, for example, requires careful attention to protective film orientation and tends to crack if parts are too thin. Ceramic tiles need specific spacing for grout lines. In every case, the fundamental approach is identical: enter your parts, define your stock, set material-specific constraints, and let the algorithm handle the layout.
How Many Sheets Will You Need?
One of the first questions in any project: how much material do I need to buy? The answer depends on your part dimensions, sheet sizes, kerf, and whether grain direction is constrained.
A rough estimate is to calculate the total area of all parts, divide by the sheet area, and add 10–15% for waste and kerf. But this frequently underestimates — parts don't pack perfectly, kerf compounds with every cut, and grain constraints prevent optimal rotation.
For example, a project with 20 parts totaling 4.5 m² of material area might seem like it needs 2 standard sheets (each 2.98 m² = 5.96 m² total). But after accounting for kerf, grain direction, and packing inefficiency, you'll likely need 3 sheets. An optimizer calculates the exact count by actually running the layout — eliminating the guesswork.
For a step-by-step method to estimate sheet count before you buy, including a formula that accounts for waste factors, see our how many sheets calculator guide. Running a quick optimization before your lumber yard trip can prevent both over-buying (wasted money) and under-buying (wasted time on a second trip).
Choosing the Right Software
The market for cut list optimizers has grown significantly. In 2026, you have dozens of options ranging from free community tools to professional-grade production software costing thousands of dollars. Choosing the right one depends on your project complexity, budget, and workflow. Here are the key decisions:
Online vs. desktop: The biggest architectural decision is whether to use a web-based optimizer or desktop software. Online tools like CutPlan work on any device — PC, Mac, tablet, phone — without installation and update automatically. Desktop tools like MaxCut Community Edition work offline but are typically Windows-only and require manual updates. The trend in 2026 is strongly toward web-based tools — they offer cross-device sync, automatic backups, and zero setup. Our online vs desktop optimizer comparison covers the full tradeoffs to help you decide.
Mobile access: If you want to plan cuts at the lumber yard, reference layouts next to your saw in the workshop, or review a project from the couch, a mobile-friendly optimizer is essential. Web-based tools that are responsive work on any phone or tablet — you can even add CutPlan to your home screen as a Progressive Web App (PWA) for an app-like experience without downloading anything from the app store. Your projects sync automatically between phone, tablet, and desktop when you're logged in.
CAD integration: If you design projects in SketchUp, AutoCAD, or Fusion 360, you can bridge the gap between design and optimization. Export your parts list as CSV from your design software and import it directly into the optimizer — no manual re-entry of dimensions required. The free OpenCutList plugin for SketchUp extracts parts with dimensions, material assignments, and even grain direction. Our integrations guide covers the complete SketchUp-to-optimizer workflow and other CAD connections.
Production-level tools: Professional cabinet shops and fabrication facilities often use integrated design-to-cut software like PolyBoard + OptiCut, Cabinet Vision, or KCD Software. These cost $500–$5,000+ and include design, cut list generation, and machine integration in one package. For most hobbyists and small shops, the combination of a free design tool (SketchUp) and a dedicated optimizer (CutPlan) achieves 90% of the same result at a fraction of the cost.
For a side-by-side comparison of the top tools — including CutPlan, OptiCutter, CutList Optimizer, MaxCut, and CutListEvo — see our best cut list optimizer software roundup. If you want to start with a free option, our free cut list optimizer guide walks through what you can accomplish without spending a cent.
Manual Layout vs. Optimization Software
Not every project needs software. Here's a practical comparison to help you decide:
| Factor | Manual Layout | Optimizer Software |
|---|---|---|
| Parts count | 1–8 parts | Any number |
| Sheet count | 1–2 sheets | Any number |
| Planning time | 15–60 minutes | Under 30 seconds |
| Typical waste | 15–25% | 5–12% |
| Multi-material | Very difficult | Automatic |
| Kerf accounting | Often forgotten | Always calculated |
| Repeatability | Start from scratch each time | Save and re-run projects |
| Cost | Free (your time) | Free tier available, Pro from $29/mo |
Rule of thumb: If your project has more than 8 parts or spans more than 2 sheets, software will save you both time and material. The break-even point is surprisingly low — even a single sheet saved on a weekend project pays for a month of a Pro subscription. If you're evaluating options, see how CutPlan compares to OptiCutter and CutList Optimizer.
Understanding Waste Percentage
When reviewing optimization results, waste percentage is the key metric. Here's how to interpret it:
- Under 5% waste: Excellent. Typical for projects with many similar-sized parts that pack tightly, or when the optimizer can use free rotation on most parts.
- 5–12% waste: Good. This is the normal range for most real-world projects with grain direction constraints and mixed part sizes.
- 12–20% waste: Acceptable for small projects with few parts, where the last sheet is inevitably under-utilized. Consider adding parts from another project to fill the remaining space.
- Over 20% waste: Check your inputs. Common causes: grain locked on too many parts, wrong stock sheet size, or parts that are slightly larger than half the sheet dimension (creating large unusable strips).
Remember that waste percentage is calculated per project, not per sheet. Your last sheet will almost always have higher waste than the others — that's normal. The important number is the aggregate waste across all sheets. If you want to reduce waste on that final sheet, consider adding parts from a future project or cutting some common utility pieces (shelf supports, jig material, test pieces) to fill the remaining space.
Step-by-Step: Optimizing a Cut List
Here's the complete workflow from project start to workshop. The steps below use CutPlan as the reference tool, but the process applies to any optimizer. If you prefer a more detailed walkthrough with screenshots and a real project example, see our step-by-step cut list optimizer tutorial.
1. Measure and List All Parts
Create a list of every part: label, length, width, quantity, and material. Be precise — a 1 mm error on a part that appears 8 times compounds to 8 mm of accumulated inaccuracy. Use consistent units throughout (mm is standard for precision work; inches work fine for North American woodworkers). For kitchen and built-in projects, use a cabinet component checklist to make sure you don't miss backs, fillers, or toe kicks.
2. Define Your Stock Sheets
Add the sheet sizes you plan to buy or already have on hand. Standard sizes vary by region:
- North America: 4 × 8 ft (1220 × 2440 mm)
- Europe: 2800 × 2070 mm or 2440 × 1220 mm
- Asia: 1220 × 2440 mm or 1525 × 1525 mm
If you have offcuts from previous projects, add those as additional stock with their exact dimensions. For a full list of standard sizes by material, see our sheet sizes reference.
3. Set Parameters
Configure the key settings that affect your layout:
- Kerf width: Measure your actual blade (typically 2.5–4 mm for table saws). See our kerf guide for common blade widths.
- Grain direction: Enable per-part if material aesthetics matter
- Edge banding: Mark which edges need banding and specify the thickness
- Stock trim: If your sheet edges need squaring, add a trim margin (5–10 mm per edge)
4. Run the Optimizer
Click Calculate (or press Ctrl+Enter). CutPlan runs 120+ strategies in a background worker thread and returns the best result in 1–5 seconds, depending on project complexity. The progress indicator shows which strategy is currently being tested. When complete, you'll see the winning layout with the lowest waste percentage, along with a summary showing how many sheets are needed and the overall utilization rate.
5. Review the Layout
Examine each sheet diagram. Check that grain directions are correct, parts are logically grouped, and the waste percentage is acceptable. Most projects should achieve 5–12% waste. If your waste is above 15%, consider: are all grain locks necessary? Can any parts be rotated? Would a different stock sheet size pack better? Sometimes switching from 2440 × 1220 to 2800 × 2070 mm sheets drops waste by 5–8% because the different proportions accommodate your specific part sizes better.
6. Export for the Workshop
Export options depend on your workflow:
- PDF cut sheets: Print and bring to the workshop. Shows each sheet with labeled parts, dimensions, and cutting sequence.
- CSV: Import part data into other software or CNC controllers.
- DXF export: Industry-standard CAD format for CNC machines. Available on CutPlan Pro.
7. Cut and Track Offcuts
Follow the numbered cutting sequence on your PDF cut sheet — it's designed so each cut produces the least disruption to remaining parts. Mark each part as you cut it by writing the part label on the back in pencil. After cutting, measure and record any usable remnants. Label them with material, thickness, and dimensions, and add them to your stock inventory for the next project. Over time, this practice significantly reduces your per-project material costs. See our offcut management guide for a systematic tracking approach.
Common Mistakes to Avoid
Even with optimization software, certain input errors and workflow mistakes can waste material and time. We see these patterns repeatedly across thousands of user projects — and they're all preventable. Here are the most frequent ones:
- Forgetting saw kerf: Setting kerf to 0 mm produces layouts where parts are cut too small. Every cut removes material equal to the blade width — on 20 cuts with a 3 mm kerf, that's 60 mm of lost material.
- Locking grain on hidden parts: Grain direction matters on visible surfaces (doors, tops) but not on hidden ones (backs, internal shelves). Locking grain on every part can increase waste by 15% for no visual benefit.
- Ignoring edge banding thickness: If you apply 2 mm edge banding to both long edges, the part needs to be cut 4 mm narrower than the finished dimension.
- Not including offcuts: Many woodworkers have usable offcuts that never get entered into the optimizer. Adding them as stock can eliminate the need for a full sheet.
The common thread: these mistakes all happen before you click Calculate. The optimizer can only work with the inputs you give it. Double-check your kerf, grain settings, edge banding, and stock inventory before running. For a complete list with solutions, see our guide on 5 common cut list mistakes and how to fix them.
Real-World Projects
Cut list optimization applies to projects of every scale. Here's how it works in practice across different project types:
Kitchen cabinets are one of the most material-intensive home projects. A typical kitchen has 10–15 cabinets requiring 40–80 individual parts across 2–3 materials (18 mm plywood for carcasses, melamine for shelves, hardboard for backs). Without optimization, you might need 12 sheets and waste $150+ in material; with it, 9–10 sheets with minimal waste. The complexity comes from managing multiple cabinet types (base, wall, tall, corner) with different dimensions but shared material. Our kitchen cabinet cut list guide provides a complete parts checklist, typical dimensions by cabinet type, and the full optimization workflow from measurement to workshop.
Beginner projects like bookshelves, desks, and storage units are perfect for learning optimization. Even a simple bookshelf with 8–10 parts benefits from software — it prevents the common beginner mistake of buying too much material (or worse, too little and making an extra trip to the store). The learning curve is about 5 minutes: enter parts, add stock, click calculate. If you're new to panel cutting entirely — not just the software but the physical process of cutting sheet goods — start with our panel cutting beginners guide which walks through a first project from selecting tools to making your final cut.
Small workshops face unique constraints — limited stock storage, smaller budgets, and often no CNC equipment. Optimization matters even more in these settings because every wasted sheet is a larger percentage of your budget. Strategies like batching projects, maintaining an offcut inventory, and buying in common sizes all compound over time. Our guide on optimizing material in a small workshop covers practical strategies for space-constrained shops, including how to decide between buying full sheets vs. pre-cut panels from the store.
CNC production shops deal with different concerns: nesting efficiency, DXF file preparation, and machine-specific constraints like tool clearance and lead-in paths. If you're running a CNC router, laser, or plasma cutter, the export format matters as much as the layout itself. Our guides on DXF export for CNC and CNC nesting vs manual cut lists cover the production workflow from optimization to machine.
Managing Waste and Offcuts
Even with perfect optimization, every project produces some waste. The difference between a cost-effective shop and an expensive one is what happens to that waste.
Offcut reuse is the single most impactful practice. After each project, measure every offcut larger than 200 × 200 mm (or whatever minimum is useful for your work). Label it with the material, thickness, and dimensions, and store it where you can find it. Before your next project, enter these offcuts as available stock in your optimizer. A 600 × 400 mm plywood offcut might be exactly the right size for a shelf — saving you from cutting into a full sheet.
Project batching amplifies the effect. If you're building a desk this weekend and a bookshelf next month, optimize both projects together. The optimizer can fit small bookshelf parts into the waste areas of the desk layout, reducing total sheets needed. This works especially well when projects share the same material and thickness.
Waste tracking over time reveals patterns. If you consistently see 15%+ waste on certain sheet sizes, it may be worth switching to a larger or differently-proportioned sheet. Some shops keep a simple spreadsheet of waste percentage per project to spot these trends. You might discover that your typical cabinet projects waste 18% on 2440 × 1220 mm sheets but only 9% on 2800 × 2070 mm sheets — the slightly larger sheets accommodate standard cabinet dimensions better.
The economic case for optimization is straightforward. A hobbyist building 4–6 projects per year with average savings of $50 per project recoups $200–$300 annually. A professional shop cutting 20+ sheets per week can save $5,000–$15,000 per year in material costs alone, not counting the time saved on planning and the reduction in errors. The ROI is almost always positive after the first project. For a comprehensive approach to all waste-reduction strategies, see our 7 ways to minimize wood waste guide.
Tips for Getting Better Results
- Group by material thickness: Never mix 18 mm plywood parts with 6 mm hardboard on the same sheet. Use material assignments to keep them separate.
- Allow rotation when grain doesn't matter: Enabling part rotation typically improves yield by 10–15%. Only lock grain direction on visible surfaces.
- Account for kerf accurately: A 3 mm kerf across 20 cuts removes 60 mm — nearly 2.5 inches — of usable material. Measure your actual blade, don't guess.
- Include offcuts as stock: That 800 × 400 mm piece from your last project might be exactly the right size for a shelf in your current one.
- Test both sheet orientations: If your supplier offers both 2440 × 1220 and 1220 × 2440 (portrait vs. landscape), try both. The optimizer may find a better fit with one orientation.
- Round up on sheet count: Always buy one extra sheet as a buffer for mistakes, test cuts, and future repairs. It's cheaper to have one leftover sheet than to make a second trip to the lumber yard.
- Batch similar projects: If you're building three identical bookshelves, optimize all three at once. The optimizer can pack parts across sheets more efficiently than three separate runs.
- Save projects as templates: If you build the same type of cabinet regularly, save the part list as a template. Adjust quantities and dimensions for each new client instead of starting from scratch.
- Run optimization before buying material: Don't estimate sheet count in your head. Run the optimizer first to know exactly how many sheets you need. This prevents both over-buying and emergency trips to the store.
- Consider edge banding early: If you're applying thick edge banding (1–2 mm), account for it in your optimization settings before calculating — not after. Post-hoc adjustments lead to parts that don't fit.
Frequently Asked Questions
What is a cut list optimizer?
A cut list optimizer is a software tool that calculates the most efficient way to cut parts from stock sheets, minimizing waste and material costs. It uses bin-packing algorithms to arrange rectangular parts on standard sheet sizes, accounting for saw kerf, grain direction, and other constraints.
Is cut list optimization the same as nesting?
They are related but not identical. Nesting allows free placement and rotation of parts at any angle, which is common for CNC machines. Cut list optimization typically uses guillotine cuts — straight, edge-to-edge cuts that are practical for table saws and panel saws. Some tools, including CutPlan, support both approaches.
Can I optimize cuts for free?
Does grain direction affect optimization?
Yes, significantly. When grain direction matters — for example, on visible plywood panels in furniture — the optimizer constrains part rotation so the grain runs consistently. This may increase material usage by 5–15% compared to free rotation, but ensures visual consistency across your project.
How much material can I save with optimization software?
Typically 15–30% compared to manual layout, depending on project complexity and part variety. On a 10-sheet plywood project at $50 per sheet, that can mean saving $75–$150 in material costs from a single optimization run.
What materials can I optimize with a cut list optimizer?
Any rectangular sheet material: plywood, MDF, melamine, OSB, hardboard, glass, sheet metal, aluminum, acrylic, polycarbonate, and more. The optimization math is the same — only material-specific constraints like kerf width and grain direction differ.
Can I use a cut list optimizer on my phone or tablet?
Yes, if it's web-based. CutPlan runs in any mobile browser and you can add it to your home screen for an app-like experience. This lets you plan cuts at the lumber yard, reference layouts in the workshop, or adjust projects on the go. See our mobile optimizer guide for setup instructions.
How do I import parts from SketchUp into a cut list optimizer?
Use the free OpenCutList plugin for SketchUp to extract your parts list with dimensions, material, and grain direction. Export as CSV, then import into CutPlan or another optimizer. Our integrations guide covers the complete workflow.
Should I use an online or desktop cut list optimizer?
Online optimizers work on any device (PC, Mac, phone, tablet), require no installation, and update automatically. Desktop tools work offline but are typically Windows-only. For most users, a web-based optimizer offers more flexibility. See our online vs desktop comparison for a detailed breakdown.
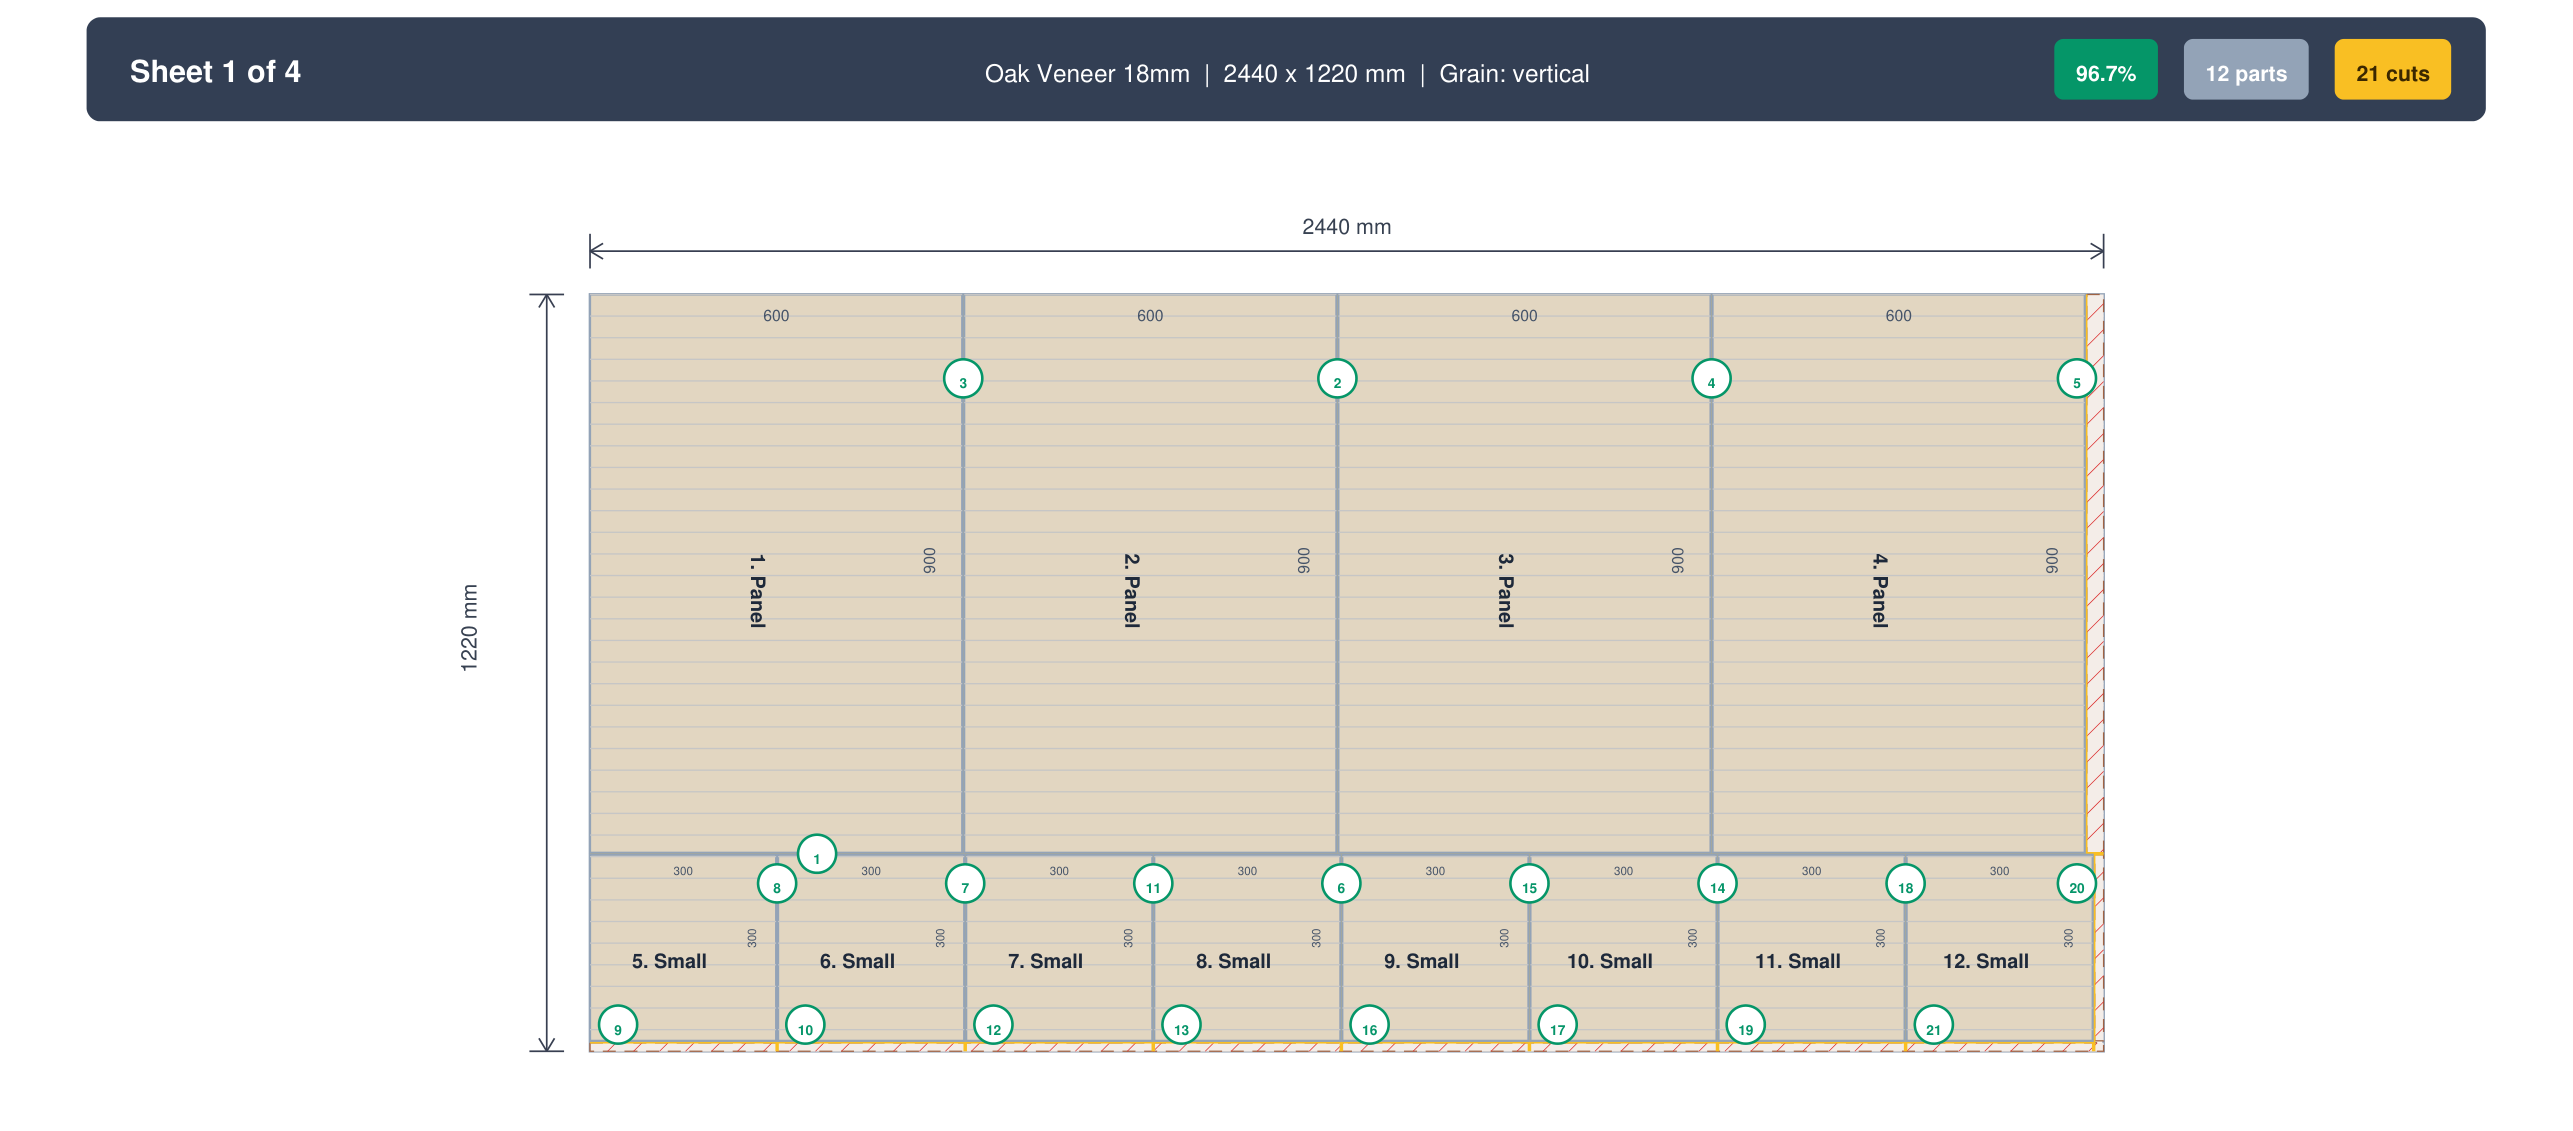
How do I read a PDF cut sheet?
A PDF cut sheet shows each stock sheet with labeled parts, dimensions, and a numbered cutting sequence. Follow the numbers to make cuts in the most efficient order. Each part is labeled so you can mark pieces as you cut them. Our PDF cut sheets guide explains every element in detail.
Continue Reading
This guide covers the fundamentals of cut list optimization from concepts to workshop practice. Explore these resources to go deeper on specific topics:
- Try CutPlan free — no signup required, optimize your first cut list in under 60 seconds
- Step-by-step tutorial — complete beginner walkthrough from first part to exported cut sheet
- Best software compared — side-by-side comparison of all major tools
- Kitchen cabinet guide — complete cut list for a full kitchen project
- 7 ways to minimize waste — practical tips beyond software optimization
- Compare CutPlan vs. OptiCutter — side-by-side feature comparison
Ready to Optimize Your Cut List?
Free, browser-based, no installation needed. Paste your parts and get an optimized layout in seconds.
Open Optimizer →