Free Cut List Optimizer for Woodworking - Complete 2026 Guide

A free cut list optimizer is a tool that takes your list of parts and available sheet stock and automatically works out the cutting layout that fits everything onto the fewest sheets with the least waste. It replaces the graph paper, the mental arithmetic, and the "measure it again on the saw" guesswork. For most hobbyists and small shops, a good free optimizer will take material waste from the 15-25% that manual planning typically leaves (CutPlan internal benchmark across user projects, 2026) down to roughly 5-12% — a gap consistent with the heuristic-vs-optimal spreads documented in the packing literature[1-3] — and it does it in a minute or two instead of an evening.
This guide is specifically about the free path: what you actually get without paying, where free tools quietly cut corners, when free is genuinely enough, and a real dollars-and-cents example so you can see the payoff. If you want a head-to-head of paid packages, that lives in our best cut list optimizer software roundup. Here we stay focused on getting the most out of a free tool.
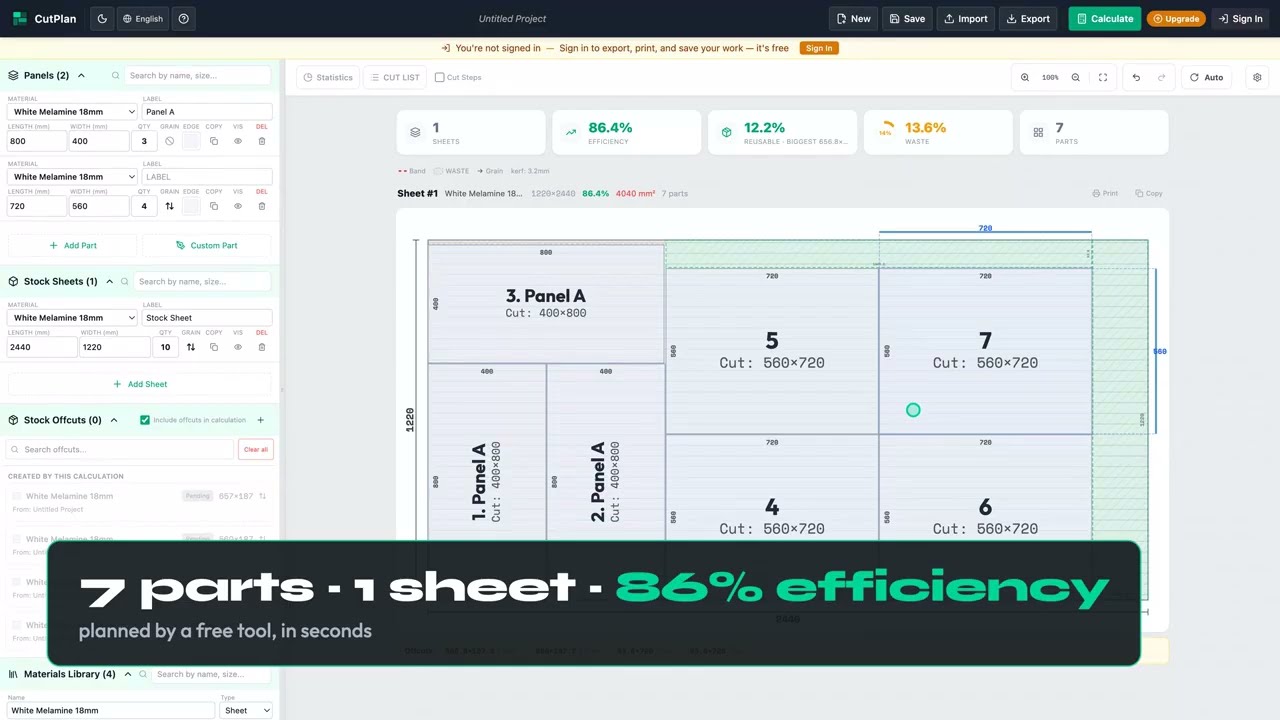
What is a free cut list optimizer?
You give it two lists. The first is your parts: every panel you need, with its length, width, and quantity. The second is your stock: the sheet sizes you can buy or already own. The optimizer then solves a packing problem, arranging the parts across the sheets so that the offcut left over is as small as possible.
Say you are building a base cabinet and need:
- 2x side panels: 720 x 560 mm
- 1x top rail carrier: 800 x 560 mm
- 3x shelves: 770 x 540 mm
- 1x back panel: 800 x 720 mm
A capable optimizer lays these out on a standard 2440 x 1220 mm plywood sheet[4], leaves room for the saw blade between every cut, respects grain where you have marked it, and hands you a numbered sequence of cuts to follow at the saw. What would have been twenty minutes of sketching becomes a few seconds of computation and a layout you can trust.
How does a free cut list optimizer decide the layout?
Modern optimizers solve what operations research calls the two-dimensional cutting stock problem — a form of 2D rectangular bin packing, first formalized by Gilmore and Gomory in 1961[1]. The problem is NP-hard: there is no formula that guarantees the perfect layout in reasonable time, so the better tools run many different heuristic strategies (different part orderings, rotations, and placement rules such as First Fit Decreasing and Best Fit), score each resulting layout by waste and sheet count, and keep the winner[3]. CutPlan, for instance, runs 148 packing strategies in a background worker and returns the best in a second or two.
Four physical realities separate a layout that looks good on screen from one that works at the saw:
| Factor | What it means | Get it wrong and... |
|---|---|---|
| Kerf | Width of material the blade turns to dust — typically 2.4 mm (thin-kerf) to 3.2 mm (full-kerf) on circular saw blades[5] | Every part ends up slightly undersized and the last one will not fit |
| Stock trim | The strip you skim off a factory edge to get a clean, square reference | Your first cut starts on a chipped or out-of-square edge |
| Grain direction | Parts that must run with the visible grain cannot be freely rotated | A drawer front reads sideways against the rest of the cabinet |
| Guillotine vs free cuts | Whether every cut must run fully edge to edge | The plan is impossible on a panel saw or sliding table |
Kerf is the one beginners skip most often, and it is the most punishing. A 3 mm blade taken across a sheet a dozen times removes almost 40 mm of usable width. Our deep dive on saw kerf shows how to measure your real blade width, and the grain direction guide explains when to lock rotation off so the optimizer respects the look of the finished piece.
What's the catch with free cut list optimizers?
"Free" covers a wide range. A genuinely useful free optimizer should handle multiple sheet sizes, kerf and trim, part rotation, grain locking, and give you an exportable cut sheet to carry to the shop. That is enough to plan almost any single project end to end. Be honest with yourself about where free tiers commonly draw the line, though, so you are not surprised mid-build.
The catch is almost never the math. Free tiers run the same packing algorithms as paid ones — what they limit is convenience. Use this decision matrix to see whether free covers your situation:
| Your need | Free tier handles it? | When you need paid |
|---|---|---|
| Planning a one-off project end to end | Yes | — |
| Kerf, trim, rotation, grain control | Yes | — |
| Repeat client work, many saved projects | No | Paid — project history and unlimited saves |
| More than a handful of exports per month | No | Paid — export volume beyond the free quota |
| DXF output for a CNC | No | Paid — CNC-ready file formats |
| Very high part counts per job | Partly | Paid — higher caps |
Is CutPlan really free?
Yes. CutPlan's free tier runs the full 148-strategy optimizer in your browser with no install: 30 calculations and 5 exports per month, in 21 languages. You can calculate and export without an account; free exports carry a watermark, and a free account adds cloud saving for your first project. Nothing about the optimization quality is behind the paywall — the packing math is identical on every tier.
| Tier | Price | Calculations | Exports | Saved projects |
|---|---|---|---|---|
| Free | $0, no card | 30/month | 5/month | 1 |
| Project Packs | $9 / $22 / $32 (1 / 3 / 5 credits) | Unlimited on credited projects | Unlimited on credited projects | +1 per credit, forever |
| Pro | $29/month | Unlimited | Unlimited | Unlimited |
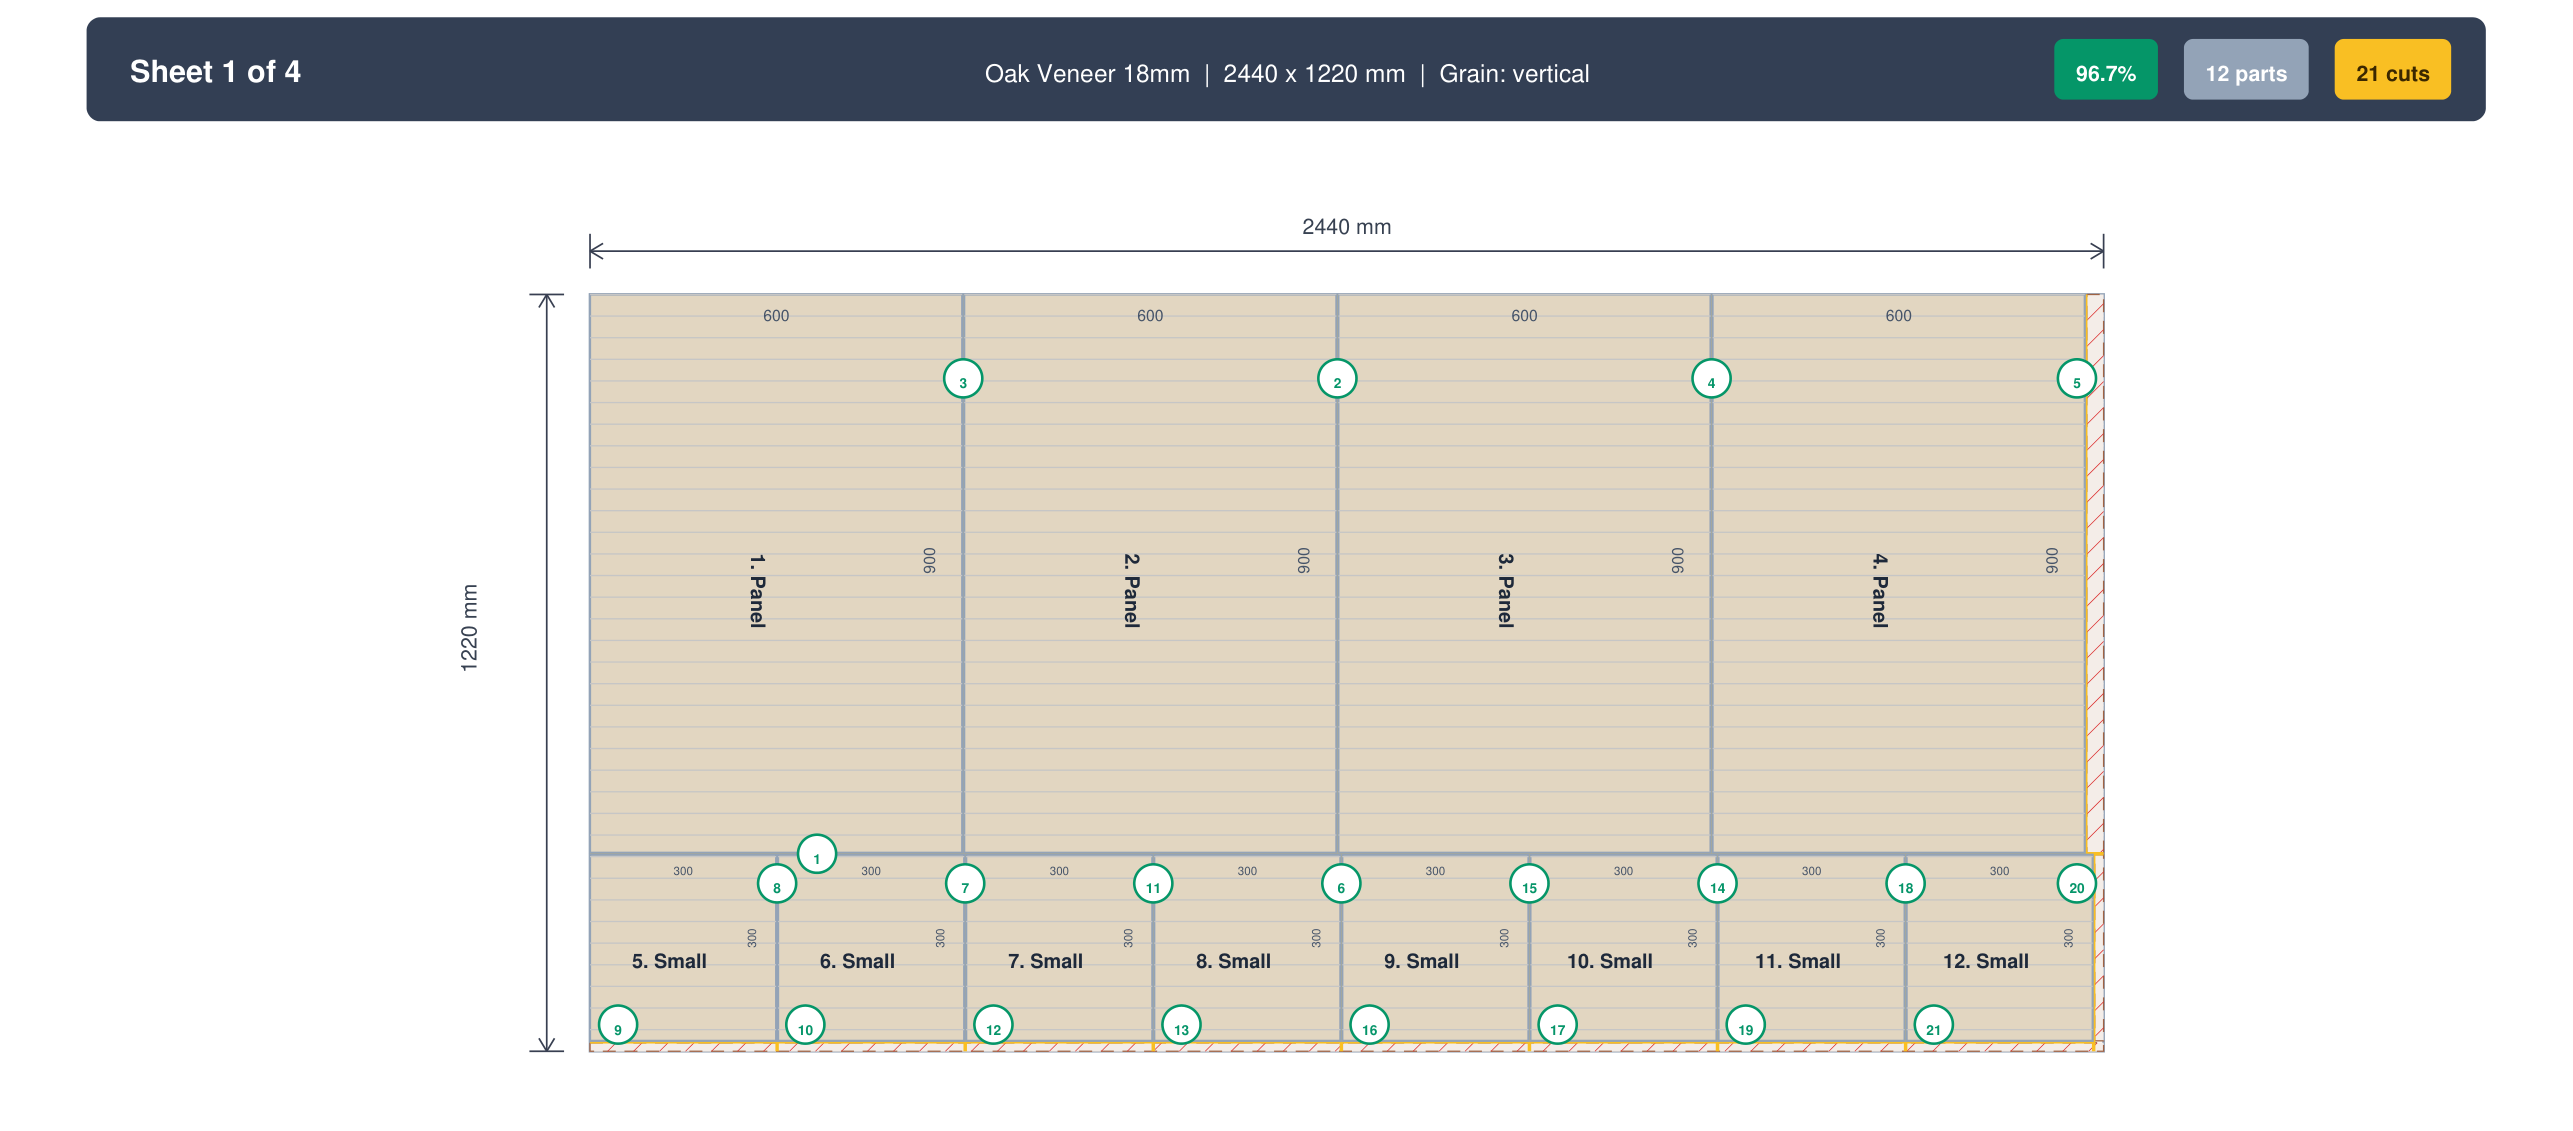
Free optimizer vs spreadsheet vs graph paper: which wastes least?
Plenty of woodworkers start with Excel or a pad of graph paper, and for three or four parts that is fine. It falls apart the moment you have more than eight or ten parts or more than one sheet size, because a human cannot cheaply re-test dozens of arrangements the way an algorithm can.
| Method | Time | Typical waste | Multi-sheet |
|---|---|---|---|
| Graph paper by hand | 30-120 min | 15-25% | Very hard |
| Spreadsheet | 15-60 min | 12-20% | Hard |
| Free cut list optimizer | 1-5 min | 5-12% | Automatic |
How much money does a free cut list optimizer actually save?
Numbers make the case better than adjectives. Imagine a small kitchen run needing about 45 square metres of finished parts in 18 mm birch plywood, with sheets at roughly 45 dollars each (2440 x 1220 mm, about 2.98 square metres of usable area per sheet; plywood prices move with the producer price index[6], so check your local supplier).
- Manual planning at 22% waste: you need about 45 / (2.98 x 0.78) = roughly 19.4 sheets, so you buy 20. Cost: 900 dollars.
- Optimized at 9% waste: you need about 45 / (2.98 x 0.91) = roughly 16.6 sheets, so you buy 17. Cost: 765 dollars.
That is 135 dollars and three sheets saved on one kitchen, from a free tool, in the time it takes to make coffee. Run three or four projects a year and the waste you are not buying adds up fast. If you want to sanity-check sheet counts before you plan the full layout, our sheet estimator guide walks through the quick version of this math.
How do you use a free cut list optimizer?
The workflow below is CutPlan's, but the shape is the same in any decent tool. Enter parts, enter stock, set the physical numbers, calculate, review.
1. Enter your parts
Add each piece with a clear label ("left gable", "adjustable shelf"), its length, width, and quantity. Mark grain direction on any part where the face grain has to run a particular way.
2. Define your stock
Add the sheet sizes you can buy, and add your offcuts too. A good optimizer will reach for existing offcuts before opening a fresh sheet, which is the single biggest free win most people ignore. Our offcut management guide covers how to track them so they get used instead of leaning against the wall forever.
3. Set kerf, trim, and units
Enter your real blade kerf, a sensible trim (often 5-10 mm per used edge), and your preferred units. If your saw only makes full edge-to-edge cuts, turn on guillotine mode so the plan is actually cuttable.
4. Calculate
Run it. The optimizer tests its full strategy set and returns the best layout, its sheet count, and a waste percentage you can read at a glance.
5. Review and export
Check the color-coded layout, follow the numbered cut sequence, and export a PDF to carry to the shop or labels for your parts. Then open the optimizer and try it against a project you have already built by hand to see the difference for yourself.
Why is my free optimizer still wasting sheets?
- Leaving kerf at zero. The layout looks perfect and then the parts come out undersized. Always enter your real blade width.
- Locking rotation everywhere out of habit. Grain only matters on visible faces. Let the optimizer rotate hidden parts and you often save 5-10% instantly.
- Forgetting to add offcuts. If your leftovers are not in the stock list, the tool cannot use them, so it opens a fresh sheet you did not need.
- Ignoring guillotine limits. A layout full of interior notch cuts is elegant and useless on a panel saw. Match the mode to your machine.
- Not double-checking material assignments. Mixing 12 mm and 18 mm parts in one job without tagging their materials produces a layout that nests them on the same sheet, which no real cut can deliver. Give every part its correct material so the optimizer keeps thicknesses apart.
Ready to Optimize Your Cut List?
Free, browser-based, no installation needed. Paste your parts and get an optimized layout in seconds.
Open Optimizer →Frequently asked questions
Is a free cut list optimizer good enough for a whole kitchen?
Yes, for the planning itself. The packing math that decides your sheet count and waste percentage is the same in free and paid tools; free tiers run the same algorithms and limit convenience instead. Those limits are export volume, the watermark on free exports, saving many projects to the cloud, very high part counts, and DXF output for a CNC. A kitchen is a planning problem, not a volume problem: you enter the parts, the sheet sizes, your kerf and trim, mark grain on visible faces, and run the calculation, and the layout you get is identical to the one a paying user would see. Where a kitchen does press on a free tier is exports, because a run of cabinets may be revised several times before you cut, and each revision you carry to the shop counts against the monthly quota. Plan the whole job free, and reach for a paid feature only if you need one of those extras.
Is CutPlan really free?
Yes. CutPlan's free tier runs the full 148-strategy optimizer in your browser with no install, and gives you 30 calculations and 5 exports per month, in 21 languages, with no credit card required. You can calculate and export without creating an account. Free exports carry a watermark, and a free account adds cloud saving for your first project. What matters most is what is not limited: the packing math is identical on every tier, so the sheet count and waste figure you see on the free tier are the same ones a Pro subscriber would get for the same parts. The free limits are about volume and convenience. If you plan a single project and export a PDF cut sheet to carry to the saw, the free tier covers the whole job. If you plan repeat client work with many saved projects, unlimited exports, or DXF for a CNC, that is where Project Packs or Pro come in.
What's the catch with free cut list optimizers?
The catch is almost never the math. Free tiers run the same packing algorithms as paid ones, so the layout quality and the waste percentage do not change when you pay. What free tiers limit is convenience: how many exports you can make per month, a watermark on those exports, the number of projects you can save, higher part-count caps, and CNC-ready DXF output. The reason is simple economics: the expensive part of the product is the engine, and giving it away brings people in, while the volume features are what repeat and professional users need and will pay for. For a one-off project, free typically covers it end to end, from entering parts through to a PDF cut sheet. Be honest about where your own use lands. If you find yourself exporting the same job repeatedly or juggling many saved projects, you have crossed the line where the free tier starts costing you time.
Do I need to create an account to use a free cut list optimizer?
No. With CutPlan the optimizer runs entirely in your browser, and you can enter parts and stock and calculate layouts without signing up. You can also export your cut sheet as a PDF straight away; free exports carry a watermark. The reason an account is optional is that the calculation happens on your own machine, so nothing needs to be stored on a server for the tool to work. What an account adds is persistence: a free account gives you cloud saving for your first project, so you can come back to a cabinet run next week without re-entering every part, and it is still free with no credit card. The practical approach is to try the tool anonymously against a project you have already cut by hand, compare the sheet count and waste to what you actually used, and only create an account once you have a project worth keeping.
Is a free cut list optimizer as accurate as paid software?
Yes. CutPlan runs the same 148 packing strategies on the free and paid tiers, so the layout quality and the waste percentage are identical whichever tier you use. Accuracy in an optimizer comes from two things: the search, which tries many part orderings, rotations, and placement rules and keeps the best-scoring layout, and the physical inputs, which are kerf, trim, grain locking, and guillotine mode. Neither is gated. What paid tiers add is convenience: unlimited exports, saved projects, and DXF for CNC, not better math. This means the accuracy of your result depends far more on you than on your plan. A free user who measures the real blade kerf, adds a sensible trim, and locks grain only where the face shows will get a better plan than a paying user who leaves kerf at zero. Compare tools on the inputs they let you set, not on the price.
How much waste can I realistically save versus planning by hand?
Manual planning on graph paper or in a spreadsheet usually leaves 15-25% waste; a decent optimizer typically lands around 5-12% on the same parts. The gap exists because a person cannot cheaply re-test dozens of arrangements, while the algorithm tries many orderings and rotations and keeps the best. What that means in material depends on the job. On a single sheet the difference is easy to shrug off, but across a small kitchen run it is often two to three fewer sheets, which is where a tool that costs nothing pays for itself. In the worked example above, a kitchen needing about 45 square metres of parts drops from 20 sheets at 22% waste to 17 sheets at 9% waste, saving 135 dollars at 45 dollars per sheet. Your own numbers will differ with part mix and sheet size, so run a project you have already cut and compare the count.
Do I have to enter kerf, or can I ignore it?
Do not ignore it. Kerf is the width of material the blade turns to dust on every pass, typically 2.4 mm on a thin-kerf blade to 3.2 mm on a full-kerf one. The optimizer places parts edge to edge on the sheet, so if it does not know the blade width it packs them as if cutting removed nothing. The layout then looks perfect on screen, but every real part comes out slightly undersized, and the last piece on the sheet will not fit at all. The loss compounds: a 3 mm blade taken across a sheet a dozen times removes almost 40 mm of usable width. Measure your actual blade once, by making a cut and measuring the slot with calipers, and enter that figure every time. Set it slightly larger rather than smaller if you are unsure, since a little extra allowance costs almost nothing while an undersized part is scrap.
What is guillotine mode and do I need it?
Guillotine mode forces every cut to run fully edge to edge across the panel, so each cut divides one rectangle into two smaller ones. That is what a table saw, panel saw, or sliding table saw can physically do: the blade cannot stop partway across a sheet and turn a corner. Turn it on if that is your equipment. Without it, the optimizer is free to nest parts in arrangements that pack slightly tighter but rely on interior cuts, notches, and stopped cuts that only a CNC router can make. The layout is elegant on screen and useless at the saw. The practical test is to look at the finished plan and ask whether you can follow the numbered cut sequence with your machine, one full-length rip or crosscut at a time. If any step needs you to cut into the middle of a panel and stop, the mode was wrong for your shop.
Can a free optimizer use my leftover offcuts?
It can, but only if you add them to the stock list as extra sheets. The optimizer does not know what is leaning against your wall; it only knows the stock you enter, so an offcut that is not in the list cannot be used and a fresh full sheet gets opened instead. Once the offcuts are entered with their real dimensions, a good optimizer will reach for them before opening new stock, which is the single biggest free win most people ignore. The practical routine is to measure each usable remnant when a job finishes, label it with its size and material, and keep a short list you paste into the stock table at the start of the next project. Skipping this step is the most common reason people buy material they already had. The offcut management guide linked above covers how to track them so they actually get used.
Is there a free cut list optimizer for melamine and MDF?
Yes. A free cut list optimizer does not care what the sheet is made of; it packs rectangles onto rectangles, so melamine, MDF, particle board, plywood, and laminate all work the same way once you enter the sheet size and the part sizes. What changes between materials is the set of inputs you give it. Melamine chips along the cut, so many shops trim the factory edges and enter that trim so no part lands on a chipped edge. MDF has no grain, so you can leave grain locking off and let parts rotate freely, which packs tighter. Faced melamine with a wood-grain print does have a visible direction, so lock grain on the parts that show. Keep each material and thickness as its own material in the parts list, because a shelf of one thickness cannot be cut from stock of another. A wardrobe with white melamine carcasses and an MDF back is simply two materials run in one project.
Is there a free cut list optimizer for PC, and do I need to download anything?
Yes, and there is nothing to download. A browser-based cut list optimizer runs on any PC through Chrome, Edge, or Firefox, so the Windows desktop or laptop you already own is the machine it runs on; CutPlan is free, browser-based, and needs no installation. A download adds nothing because the packing calculation happens inside the browser tab on your own computer rather than on a remote server, so there is no installer to run and no program to keep updated. Searching for a cut list optimizer to download for PC usually leads to older desktop programs that only run on Windows and must be reinstalled on every machine you use. A browser tool also opens on a laptop or a tablet at the saw, not only on the one PC it was installed on. Open the site, enter your parts and stock sheets, calculate, and export a cut sheet, all from the PC you already have.
Sources
- Gilmore, P. C. & Gomory, R. E. (1961). "A Linear Programming Approach to the Cutting Stock Problem." Operations Research 9(6), 849–859 — the founding formulation of the cutting stock problem.
- Wäscher, G., Haußner, H. & Schumann, H. (2007). "An improved typology of cutting and packing problems." European Journal of Operational Research 183(3), 1109–1130.
- Lodi, A., Martello, S. & Monaci, M. (2002). "Two-dimensional packing problems: A survey." European Journal of Operational Research 141(2), 241–252.
- U.S. Voluntary Product Standard PS 1-19, Structural Plywood (NIST / U.S. Department of Commerce; administered with APA — The Engineered Wood Association); EU equivalent: EN 13986.
- Manufacturer blade specifications (Freud, CMT, Forrest): full-kerf ≈ 1/8 in (3.2 mm), thin-kerf ≈ 3/32 in (2.4 mm).
- U.S. Bureau of Labor Statistics, Producer Price Index — softwood plywood (series WPU083), retrieved August 2026.
- Waste-percentage baseline (15–25% manual, 5–12% optimized): CutPlan internal benchmark across user projects, 2026.